Sunday, October 30, 2011

Happy Halloween!

Just wanted to wish all my TTT peeps a Happy Halloween. Make sure to get those cameras out and ready to take some great Halloween photos. Here are a few ideas of fun photos you can take today!

Photo prompt ideas:
  • If your child is wearing Halloween attire to school snap a picture of them before they leave
  • A fun Halloween lunch
  • Pics of attendants and decorations at Halloween parties
  • Class parties at school; make sure to include the teacher
  • Make a Halloween snack and take pictures of you and your children baking it and the finished project. Ideas; popcorn balls, pumpkin muffins, candy apples, apple crisp, spiced nuts, cupcakes,etc.
  • Take pictures of your children in their costumes outside before it gets dark (this will ensure some great crisp shots before the trick or treating begins)
  • Bowls of trick or treating candy
  • Jack o lanterns all lit up, (use your night mode for this/ no flash)
  • Inside your childs trick or treat bag to see all the loot they got
  • Trick or treating (you will need to take alot since it will be dark and lots of movement. Keep shooting and hopefully you will get a few good ones.)
  • Halloween traditions to you and your family.
  • Decorations around your house and neighborhood.
All these photos will be great to use with your new October Kit!

Friday, October 28, 2011

Using Actions in Photoshop Elements

So by now you've got your Actions installed right? (Any questions, please ask.) So first thing I'm going to do is find a nice picture to play with. Pick a picture that's already decent, actions can't save bad photos :) If your browsing in the Elements Organizer, simply select your photo and hit Ctrl-i to go into full-edit mode. Or if you are already in the Editor, then hit File-Open and select your photo. Here's mine opened up in the Editor:
To the right side of the screen you can see the Effects menu. If your Effects menu is not showing, go to the Window menu at the top and select Effects. Now in the Effects menu next to the drop-down box, select the third option from the right called "Photo Effects". Then in the drop-down box, select PW Set 1 (this is the Action set you installed). You can see how I have mine already selected and the Actions available show in the boxes below. So for this nice fall photo, I'm going to select to run Action "Fresh Color". Simply double-click and then select "Continue". And this is how it turns out:
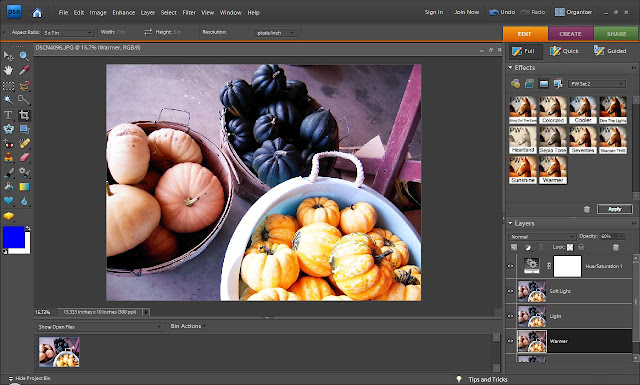
You can see that my photo is a bit on the bluish side (since it was taken in the shade probably). So I'm going to also run an Action that will increase the warm tones. If you also installed PW Action Set 2, then go up to the drop-down box and select PW Set 2. There will then be a new set of Actions displayed, like you see in my example below. I choose to run the "Warmer" option. But it's a little warmer than I want so I'm going to make sure that the Warmer layer is selected in the Layers menu that appears in the bottom-right and I'm going to go to the Opacity drop-down box and move the slider from 100% to 60% to decrease the effect of the Action.
Now that the photo is how I like it, I need to be able to save it as a jpeg so I'm going to go back to PW Set 1, and select Flatten, which will meld all the Layers into one. At this point you can Save it (Ctrl-S) and your done!
Feel free to play around with the different actions and have fun!

Wednesday, October 26, 2011

Photoshop Actions (for Elements users too)

If you use Photoshop and like to edit photos, then you need to try Actions! If you have Photoshop and don't know where to start, then you need to try Actions!  Actions let you do a bunch of coordinating edits with a single-click (or two) of your mouse.  Today I will show you where to try some free actions, and tomorrow I will show you some examples of how to use them.

For the full-version of Photoshop, you can download Pioneer Woman's free set of Actions here:
http://thepioneerwoman.com/photography/2010/03/actions-update-2/

And for Photoshop Elements users, you can download Pioneer Woman's revised set of Actions here:

http://thepioneerwoman.com/photography/download-files-for-pioneer-woman-actions-elements-version/

Please install according to the instructions!

Friday, October 21, 2011

Cupcake topper tutorial

It is so easy to make your very own unique cupcake toppers. These ones are birthday themed but you could do this for ANY holiday (including Halloween)! All you need is a die-cutting machine (or a neat punch shape), or possibly the patience to cut out several shapes by hand, and some coordinating cardstock and toothpicks.
Here's what you'll need along with some glue and toothpicks.
Start by cutting out your shape - I set my machine at 1 1/2".
Then punch your circles. For one dozen cupcake toppers you'll need 12 smaller cirlces and 24 larger circles.  I cut my smaller circles with a 1 1/2" punch and the larger with a 1 3/4" punch.

Now glue all the layers together putting two of the larger circles right side out (so the texture shows on both sides). Another idea is to adhere the birthday child's age on the opposite side!
Now smash a toothpick between the two larger circles (make sure you used plenty of glue).

And there you have it - your own personal cupcake topper!


Friday, October 14, 2011

Tutorial for my 2012 hanging calendar


Today, I will show you how you can easily create a calendar like the one I made with the TTT September kit #2. As soon as I saw this paper (Simple Stories It's Your Day) in the kit, I knew what I was going to do with it!

You will need:
- the paper above
- at least 3 sheets of patterned papers
- 12 horizontal photos sized to 3.75x2.5
- about 12 inches of wire and mini clothespins
- nose plier

1/ Cut the twelve months out of the It's Your Day paper:

2/ Cut twelve pieces of patterned paper to 4.25x6 inches:

3/ Adhere each month on the bottom portion of your patterned papers and handwrite (or stamp) the numbers for each day (looking at a 2012 calendar online):

4/ Trim your photos to 3.75x2.5 and adhere them on top of each month card (the width should match):

5/ Using about 12 inches of wire and a nose plier, bend it until it looks like a hanger but don't close the top part before sliding 2 mini clothespin through it:

6/ Attach your twelve month in order with the clothespins and decorate with ribbon and bingo pieces (in the kit). Here is a side view:

This one will be a Christmas gift to my parents as I always make them a photo calendar every year :) Please link us if you create one!

Thursday, October 13, 2011

Monthly Sketch Layouts

Every month the Design team creates a layout with their kits all using the same sketch. It is alot of fun to see the different interpretations of the same sketch. This month we choose a sketch created by design team member Carrie Labani. Check out her blog Carrie on Crafts every other monday for more sketches and examples!

The Sketch:


Anna and Carrie's take:


Chrissy and Nathalie's take:

Tuesday, October 11, 2011

Transparency Pages

Every month the design team creates pages with transparency from the Transparent touches store. Sometimes they are full 8.5x11 pages, journal spots, bracket blocks, or the fun ones that come in your kit. If you have never tried a transparency on your pages I suggest you check out all the fun options there are available for you in the store.

Anna and Carrie's Pages:

Nathalie and Chrissy's pages:

Friday, October 7, 2011

September 2011 DT Reveal: Kit #2

This month the September #2 kit featured a great new line from Simple Stories and Fancy Pants. Kit #2 is packed full of great new papers for fall and back to school. To compliment the papers there's some fun cardstock stickers. My favorite things are the wood pennants and wood numbers, perfect for back to school pages. Enjoy your kit and check out what the design team came up with below.

Chrissy's Designs:


Nathalie's Designs:


Make sure you check out Nathalie's post from earlier all about great fall ideas to get you scrapping!!!

September 2011 DT Reveal: Kit #1

This month the September #1 kit featured a great new line from Bo Bunny and My Minds Eye. Kit #1 is packed full of the girly cupcake and baking accessories! To compliment the papers there's some beautiful chipboard embellishments from Bo Bunny. I hope you enjoy your kit because I know I sure did. Check out what the design team came up with below.

Carrie's Designs:


Anna's Designs:


Make sure you check out Nathalie's post from earlier all about great fall ideas to get you scrapping!!!