Thursday, May 27, 2010

Father's Day Project: Chinese take-out with fortune cookies!


I won't be offering you a chow mein recipe (nevertheless I'll highly recommend this one from Jamie Oliver ;) but I'll show you how to make a fun and personalized gift for Father's Day which happens on June 2oth this year. So let's get started:

You will need:

For the container:
- a take out box (purchased mine from Michael's for less than $2)
- two identical 12x12 sheets of patterned papers
- ribbon, tag and whatever else you want to use to embellish it
For the cookies:
- 4" circles cut out of patterned papers (the amount depends on how many fortune cookies you want)
- a strong type of double sided tape
- cardstock to print the fortunes on

1/Gently take apart your take-out box by removing its handle. Trace and cut out four sides out of your 12X12 papers as shown below:


2/After you've glued your papers on the outside, make sure to recreate the holes and slits that you have covered up so that you can reassemble your box:


3/ Create a tag with your sentiment and/or embellish the box itself.

4/ For the fortunes, I asked my kids to tell me things they love about their Dad. I printed their sentences (such as "I love it when you take me fishing", "You're awesome Dad!" and such) onto the cardstock paper and cut them into strips:


5/You can find several tutorials for these paper cookies online but I will share the method I used here. Take one of your 4" circle and while gently folding it in half, pinch it only in the middle:

6/ Place a piece of double sided tape perpendicular to your fold as shown here:

7/ Then fold your circle in the opposite direction from your first fold and place your fortune inside the circle: (stay with me here!:)

8/ While holding the cookie as shown above, gently push on the crease you've created in #5 and glue together the pieces that meet (where you have placed your tape):

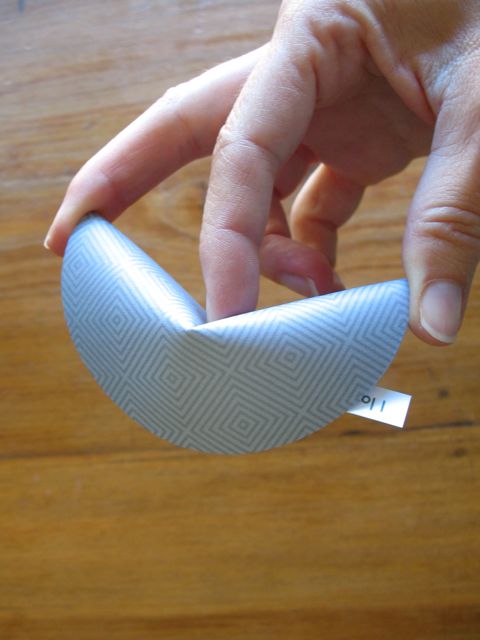
The paper will fold onto itself and become a little fortune cookie!

Place your fortune cookies into your container and I guarantee you smiles (from dads AND kids) on Father's Day!

Tuesday, May 25, 2010

Step by Step

Materials:
- three pieces of patterned paper
- one piece of cardstock
- alphabet letters
- border sticker
- journaling block
- rub-ons
- coordinating embellishments

Step 1- Cut three pieces of patterned paper. For the vertical strip cut it 3 x 10 and adhere to page. For the horizontal strips cut the top strip 1 1/2 x 10 and adhere over the vertical strip and cut the other horizontal strip 2 x 10 and adhere over the other strips. Place a border sticker on the top edge of the 1 1/2 x 10 strip of patterned paper.

Step 2- Cut three photos 3 x 3 and mat with cardstock. Adhere over the patterned paper strips and sticker border as shown.

Step 3- Place a journaling block to the lower left corner of your photo on the bottom of your page. Add 3-4 journaling strips under the right side of the bottom photo. Use alphabet letters to create a title on the right side of the layout. Use rub-ons to extend the title or add a subtitle. Finish your layout by adding three coordinating embellishments as shown.

**for this layout I used TTT April Kit #3 Crate Paper-Brook with MME- Little Boy Blue

Saturday, May 22, 2010

Transparency Layouts

Here are some awesome 1 and 2 page layouts made by the TTT design team using TTT transparencies. Enjoy!

By Jen and Carrie:


By Chrissy:


By Nathalie:


By Chrystal:

Thursday, May 20, 2010

What A Catch!

TTT had an awesome Spring crop last month and so I thought I would take the time to highlight a few layouts that were uploaded for the crop. TTT's customers and visitors really are a talented group!

#1-Remember When by mamadonald

I love the vintage feel of this layouts with the older photos and all the florals. It's just a beautiful page to look at and admire. I love it!

#2-Blue Tongue by Scrappin_in_AK

This page really pops to me! It is so fun from the photos to the colors used to the interesting title letters. This is a really eye catching page all around!

#3-4th of July by Annabanana

I love the simplicity of the design. I love the way the photos were cut and how the paper was layered with the title and all. It's a really great page.

These ladies did amazing pages as well as many others. If I could I would feature many more. Thanks to all the people who participated in our online crop last month and shared their work with us!

Saturday, May 15, 2010

TTT JUNE KITS!

TTT JUNE 2010 kits are up!
Each kit features *NEW* papers from CHA!!

(You do not have to be a TTT kit member to purchase kits and sale items)

If you haven't already emailed me to let me know which kit(s) you'd like for JUNE...please do so. If you would like to order an extra kit, just let me know which ones you'd like and I will put you down for those. I try to keep up with the kit emails as they come in so I know when a kit is sold out...but you may not get an email response from me confirming your choice for a few days. It takes me quite a while to go through them individually. Thanks for your patience! If you have a question in your email, I do try to answer those quickly.


~TTT KIT CLUB SPECIAL PROMOTION GOING ON NOW~

Refer a friend to TTT for 6 months and you will BOTH receive a FREE GIFT! (must mention the special to receive the gift)


There are3 great kits offered for the month of JUNE...plus some great add ons and extra things available!


CLICK HERE for more information
about TTT kit subscriptions.

CLICK HERE to read the FAQ's about TTT's kits.


SAVE THE DATE:
Scrapbook Fun Fest is an all day scrap event (10am-10pm) on May 29th in southern Oregon at 7 Feathers Casino. I will be a vendor at this event! If you want more information and to buy a ticket, just go here for more info: SCRAPBOOK FUN FEST


Have you seen the upcoming paper companies I'm using for upcoming TTT kits???

TAKE A LOOK HERE TO SEE WHAT'S COMING UP THROUGH AUGUST!!!


To see full list of each kit description, click on the kit picture below

JUNE #1: Bella Blvd--Estate Sale


Photobucket

Photobucket


Photobucket


JUNE #2: Bella Blvd--Man of the House(NOW SOLD OUT)

Photobucket

Photobucket

Photobucket


JUNE #3: Girls' Paperie--On Holiday and Pink Paislee--365 Degrees

Photobucket


Photobucket


Photobucket


You don't have to be a kit member to purchase these items. You can send me an email letting me know what you'd like to order. Thanks!

I have a couple of monthly kits available from past months (prices vary) (Click on the name of the kit to see a picture of it)


August #2: $24

September #3: $24 (I have two left)

November #1 $24

December #2 $24

January #2: $27

February #3: $27


March #1: $27

March #3: $27

May #1: $27

May #3: $27


PLANNING A VACATION THIS YEAR?? COME ON A CRUISE WITH TTT!
7 night cruise to the Eastern Caribbean
October 10, 2010
prices start at $593 per person+taxes

Photobucket


Top50 Scrapbooking Kits

Thursday, May 13, 2010

Transparency Technique

Using Coaster Blocks for Titles

Some of my favorite transparencies that TTT has to offer are the coaster blocks. I love their shape and the little saying around the edge of the circle that go with the title inside. I like to use them for the titles on my pages but sometimes have a hard time incorporating them into the page design so that they pop off the page. Here is two flawless techniques to help you make them take center stage!

Option 1: Cut around the edge of the circle on the transparency. Then cut a circle piece of coordinating cardstock. Take another piece of coordinating patterned paper. Mount the circle cardstock on it then use scalloped scissors and carefully trim around the edge to make a scalloped circle (if you have a scalloped circle punch big enough that would work too.) Then using glue dots or transparency adhesive adhere the transparency on top of the cardstock circle. Use Stickles glitter glue and make colored glitter dots on top of the dots around the edge of the transparency or color in spots with galaxy markers. Attach to your page using pop dots.

Example 1:
Option 2: Cut around the edge of the transparency. Punch a circle out of coordinating colored cardstock to fit the inside circle of the coaster block (I used a 1.5 inch punch.) Then mount that on a larger white circle followed by a scalloped circle. Or if you have circle journaling blocks (the one I used here is from Jenni Bowlin) those work great too! Then add a letter or number to the inside of the circle if it calls for it.

Example 2:

Monday, May 10, 2010

May Kit #1 Layouts

Take a look at what has been created with TTT May kit #1- Crate Paper Pink Plum!

Created by Carrie:


Created by Jen:

May Kit #2 Layouts

Take a look at the layouts and wonderful mini album made with TTT kit #2- Paper Loft Dude Collection!

Created by Nathalie: