Sunday, December 19, 2010

Homemade Christmas Gift


Need a quick and easy homemade Christmas gift? Well, what about a cookies in a jar recipe. All you need is a glass jar, ingredients, a tag with the recipe, ribbon, and a cookie cutter.

In the glass jar layer:
2 1/2 c flour
1 tsp salt
1 tsp baking soda
**mix together
1 c brown sugar
1/2 c white granulated sugar
1 c mini chocolate chips/ mini M & M's

Once the jar is filled, tie a ribbon around the top and attach a tag with the recipe (see picture below) and a cookie cutter. (You can create a tag using Microsoft Word and adding a fun holiday border. Cut your tag with decorative scissors and decorate.)
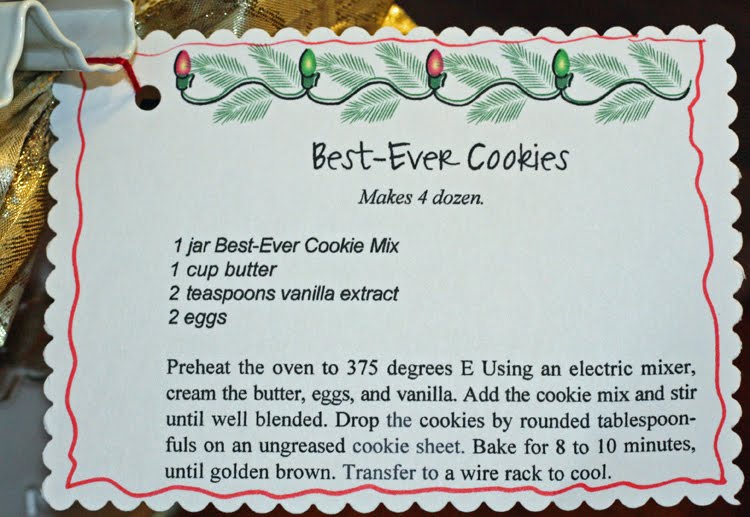
**the tag reads:

Best-Ever Cookies

Makes 4 dozen

1 jar Best Ever Cookie Mix
1 cup butter
2 tsp vanilla extract
2 eggs

Preheat the oven to 375 degrees F. Using an electric mixer cream the butter, eggs, and vanilla. Add the cookie mix and stir until well blended. Drop the cookies by rounded tablespoons on an ungreased cookie sheet. Bake for 8 to 10 minutes until golden brown. Transfer to a wire rack to cool.

Saturday, December 18, 2010

Ribbon Ornaments

So if you tried the ribbon Christmas Trees (see post below) then you need to try the same technique to create ribbon ornaments. Again, all you need is a sewing machine, ribbon, and cardstock.

Following the steps from the ribbon trees:

First, punch out different sized circles from cardstock and attach to a second piece of cardstock.
Second, lay ribbon across all of the pre-cut circles and sew. (**see example under ribbon trees)
Finally, cut around the circles and decorate. (I cut small squares from shimmery gray cardstock and attached to the back of each ornament. Then, I punched a hole and tied on a ribbon. You could also use a medal hook.)
Now they are ready to add to your tree, card, or layout!

Friday, December 17, 2010

Ribbon Christmas Trees

Want a fun way to add Christmas trees to your layout? Well what about ribbon trees. It's "sew" easy!! All you need is a sewing machine, cardstock, and ribbon.


First: Cut triangles from cardstock and adhere to a second piece of cardstock.Next: Lay and sew ribbon across each pre-cut triangle.
Last: Cut your pre-cut triangles out and decorate.
Now you can add them to your next layout or card or attach a ribbon and hang them on your tree!

Thursday, December 16, 2010

Sketch Layouts

This month we had the honor of working with a sketch from The Scrappiest. If you haven't had the chance to check out some of her sketches check them out now or try out the one she made for us to use this month! We would love to see your creations in the User gallery, here on the blog or join us on the message board for some fun!

The sketch:


The design team's creations:

Chrissy and Carrie


Nathalie


Happy Holidays and have a great New Year!

Tuesday, December 14, 2010

Transparency Tuesday!

Every month the design team creates pages with transparency from the Transparent touches store. Sometimes they are full 8.5x11 pages, journal spots, bracket blocks, or the fun ones that come in your kit. If you have never tried a transparency on your pages I suggest you check out all the fun options there are available for you in the store.

Nathalie and Candy:


Carrie and Chrissy:

Saturday, December 11, 2010

December 2010 TTT Kit Designs-Kit #1

It's time for the kit reveals by the design team. This month featured some fabulous Christmas themed kits! This one was a fun twist; it was a project kit that included a shaped mini album by Little Yellow Bicycle and all the shaped papers and embellishments to make the album!

Monica's designs:


Candy's designs:


December 2010 TTT Kit Designs- Kit #2

It's time for the kit reveals by the design team. This month featured some fabulous Christmas themed kits! This one was filled with lots of fun embellishments and paper from the Little Yellow Bicycle Christmas Delight line.

Nathalie's designs include some super fun Christmas ideas like Advent calendar ornaments, cookie gift set, and cards!


December 2010 TTT Kit Designs-Kit #3

It's time for the kit reveals by the design team. This month featured some fabulous Christmas themed kits! This one has a fun collection of Basic Grey's Jovial line mixed with some cute little snowman stickers and glittery snowflakes!

Chrissy's designs:


Carrie's designs:


Monday, December 6, 2010

Making your own Glimmer mist

I love Glimmer mist and love all the different colors there are to offer. Of course I do not need a big bottle of all of them so I recently learned a way to make my own mini mist. No first off I want to start with saying that I did not come up with this on my own a scrappy friend of mine taught me and then I googled it and there are all different ways to do it. This I think is the best way to do and the most reliable as it is Tim Holtz way of doing it! (So it's got to be good right?)

The supplies:
  • Package of Mini Misters (by Ranger and you can find them at Micheals. You could also use a spray bottle from the travel area of a store but it would not be as fine of a mist)
  • Perfect Pearls (use a coupon on these at your local craft store. I bought the metallics but they have colored ones too. Make sure it is Perfect Pearls as they already have a binder in them.)
  • Ink droppers with dif colored inks (I suggest the Tim Holtz Distress ink refills. There are lots of dif colors you can choose from and then you can also use them to reink your distress ink pads. Do not use alcohol inks. Some people say they have used paint but I don't think that would work very well.)
  • Water


The steps:
  • Put 1/4 teaspoon perfect pearls in your mini mister
  • Add a couple drops of ink
  • Fill with water leaving about a 1/4" room at the top for air
  • Swirl the mixture until combines (swirling instead of shaking helps ensure you don't clog your mister)
  • Now spray to your hearts content. I used mine to make this fun tag for Christmas

Saturday, December 4, 2010

Weekend Sketch

I know most of you are busy with the bustle of the Holidays already, at least I know I am. It seems like it just turned December 1st and yet I am swamped with Holiday activities....oh wait it did. So if you get a chance to break away from the family and have a few minutes to scrap here is a fun sketch to get those creative juices flowing.

The sketch (tip: try another layout size for fun or extend it across two 12x12 pages!):

My example:

Have a happy Holidays and check back soon for the December Kit reveals!