Thursday, September 25, 2008

Step-by-Step

For this layout, you will need the following:

*Stamps or rub-ons
*3 coordinating sheets of patterned paper
*1 sheet solid cardstock for base
*scrap cardstock for words

Photobucket

***Don't forget to ink edges before you adhere your paper (if desired.

1. Trim your first sheet to 9 in. wide by 11 in. tall. Adhere approximately
1/2 inch from left.
2. On a different sheet, cut a circle 5 1/2 in. in diameter. Adhere the
circle with it overlapping the right bottom corner, then trim away excess.
3. On the third paper, trim a 8 1/2 in. wide by 6 1/2 in. tall photo mat.
Adhere.
4. Stamp/rub-on flourish on bottom left corner.
5. Stamp/rub-on heart or other shape on the same paper you used for your
circle. Cut out, and adhere.
6. Stamp/rub-on title on your scrap cardstock, then trim and adhere.
7. This is hard to see in the photo, but I inked the layout with
coordinating green ink

Note: I used a 5x7 photo, but you could use 2 vertical 4x6's as well.

Tuesday, September 23, 2008

Tag Ideas by Chrissy Greenman

While I was in Michigan this summer I decided to take pictures of all of the houses that reminded me of my childhood. I created this tag album to showcase those houses. I used one tag as a pattern to cut the pictures and patterned paper. I typed my memories from each house on a transparency and attached them to my album. I punched holes in each tag and attached them with a metal ring and ribbon. Then, I decorated a library card to hold my album. I love the TTT transparency on the front. It works perfectly for what the houses look like today in ’08. I also typed a description of my album on a transparency and attached it under the TTT transparency.

PhotobucketPhotobucketPhotobucket

Thursday, September 18, 2008

September Member Spotlight!

DT member Nathalie Leonelli did a member spotlight interview on a very special TTT member. So let's introduce her to you.


Your TTT member name? Traci Smith- Traci~MN (used to be mommyof2cutegirls)

Tell us a bit about yourself and your family (and pets?) I am a working mom of 2 little girls, Vanessa, 4, and Aubrey, 21 months, and wife to Tony for 8 years now (although we’ve been together for 12 years now in August!!) We used to have 2 cats, but both are in kitty heaven now! My daughter wants to get a puppy, but we keep telling her when Aubrey is older then you can get one! I currently live in SE MN, about 10 minutes NW from Winona, MN (which is 2 hours south of the Twin Cities), along the Mississippi River.

How did you get started in scrapbooking? How long have you been scrapbooking? I got started in scrapbooking most recently when my 4 year old was born in 2003. A gal I worked with had won a gift certificate from a LSS in LaCrosse, WI. She gave me the certificate, as she wasn’t a scrapper, as I had mentioned an interest in it. From there…it just got out of hand. I would say, though, that I’ve been scrapping since I was a kid. I made my own “baby book” when I was 12 or 13. Then moved on to journaling my senior trip to Mexico in a photo album. I also made various books on our trips that my husband I took to California and then on our cruise to the Cayman Islands/Jamaica/Ochos Rios in early 2003. I love making mini albums for gifts and always make my mom a calendar for Christmas for the following year!

What is your favorite place to scrap? I love scrapping at home, at my computer desk/scrappy desk. On occasion, I will go to a crop with some girlfriends, but maybe only once or twice a year. It’s too hard packing all this mess up!!

What are your favorite scrapping snack and drink? I usually just have a A&W Cream Soda while I’m scrapping.

What product(s) are you addicted to right now? I’d have to say I’m addicted to anything with lines…be it scrap paper or the little journal cards. I love the Making Memories noteworthy line.

What inspires you creatively? It’s hard to say what inspires me creatively…I think its just the world around me, and taking a step back from things to remove myself from situations and see things from different views. Then I always find a new angle on things and see them differently, and that gets me going creatively! I will see a commercial or see the colors on my daughter’s clothes and think that those would be cool on a scrapbook page!

What brought you to TTT? I found TTT off of ebay when I was hunting down scrapbook stuff in the early years [2006]…Monica was selling her transparencies on there, and I fell in love with them! More recently, I just loved going on the message board and taking part in the different on-line crops and challenges.

What do you enjoy the most about TTT? I love looking at the different layouts that the design team creates with the products and love the message boards to see where other’s get their inspiration.

What is on your scrappy wish list? The big Cricut and Photoshop and a new 12x12 scanner.

What is something about you that we may not know?? You may not know that I am on the design team at my local scrapbook store, Scrappers Haven!!
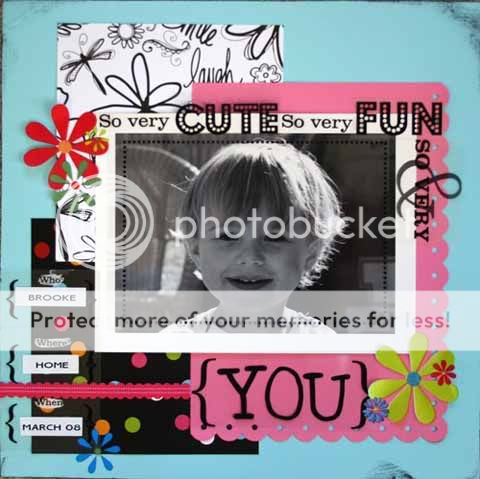
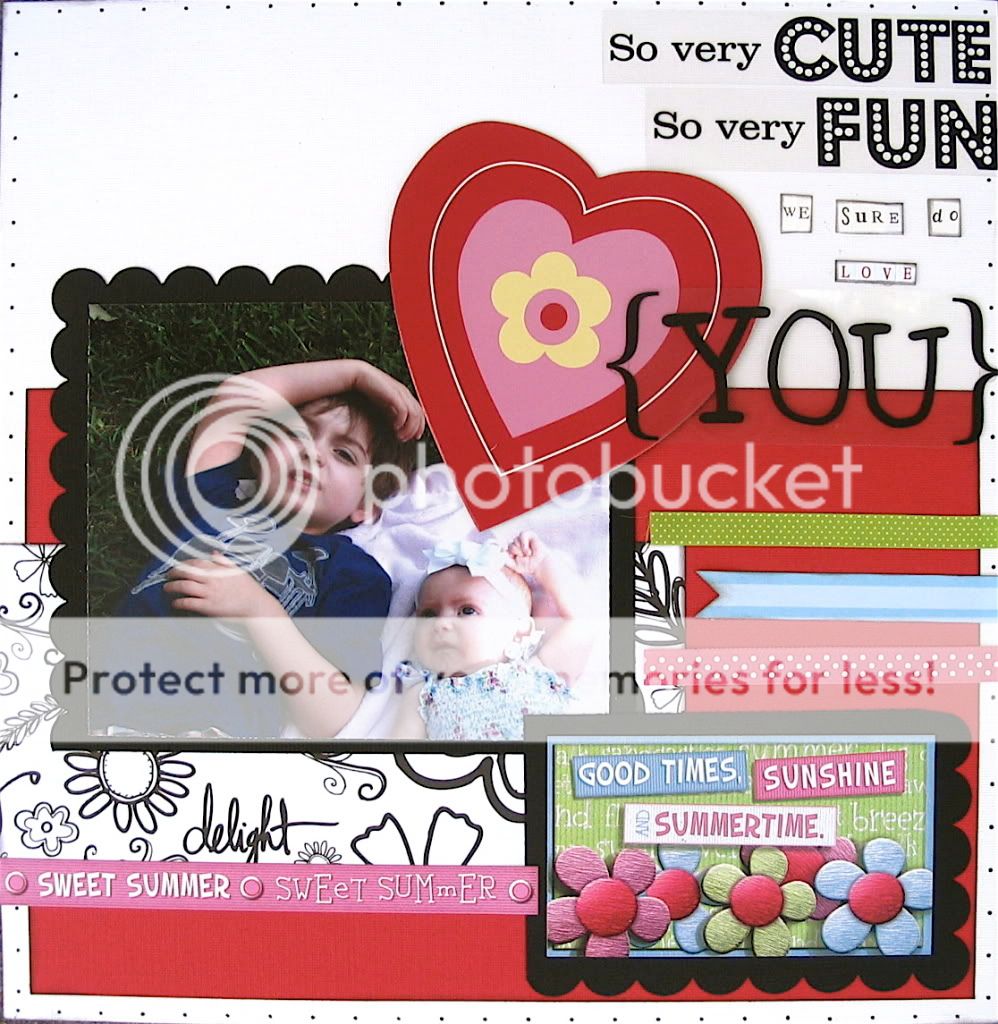
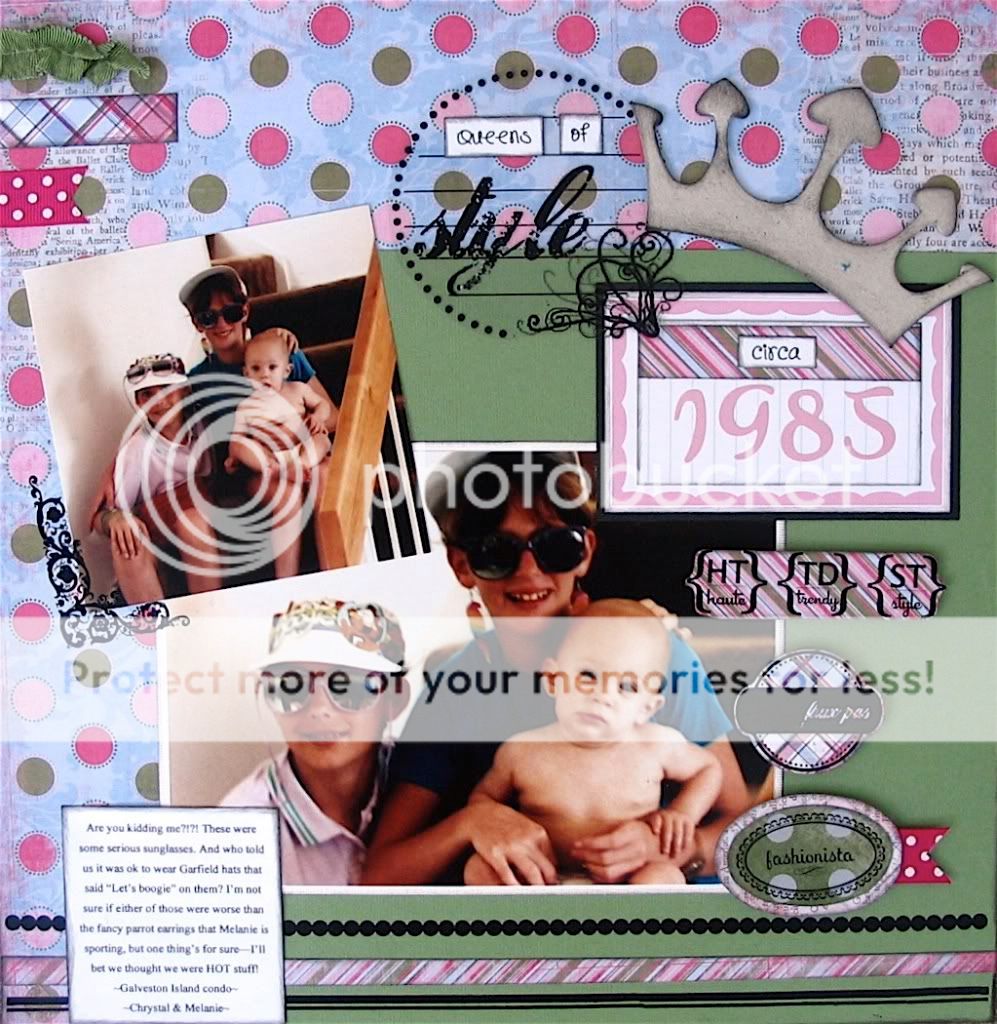
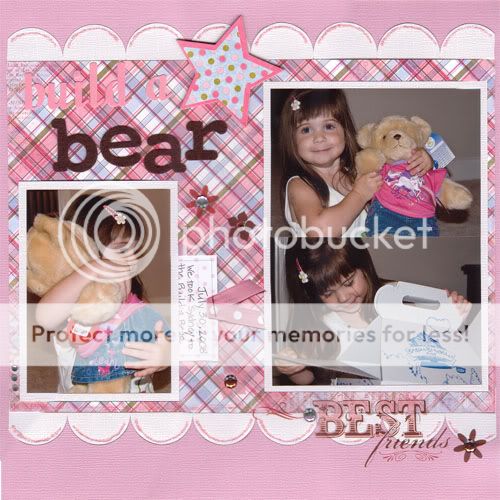
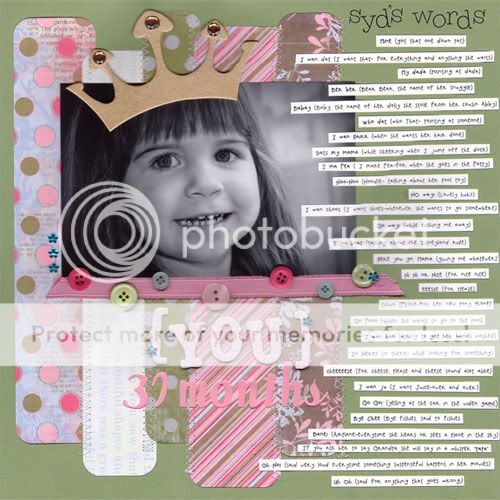
LO by Traci:


Thanks Traci for being our member spotlight for September!

Tuesday, September 16, 2008

What A Catch!

What A Catch is when a design team member picks LOs or projects from the gallery and shares what they find special or intriguing about the work. This month TTT designer Chrissy Greeman shares with us three LOs and what she loves about them.


Anna- “Rocking Chair” by annaBananna
What a great idea to scrap a page about an item that brings back so many memories. I love how she made a collage with four pictures to present it in a grander scale. The colors are so bright and cheerful and really make the picture pop! The overall design is flawless!


Heather- “You are my …” by bowserbrood
I just love the look of collages and this layout is a great example. It is so simple but really makes a statement. The colors are perfect together and the choice of patterned paper is awesome. They are all so bright and fun. All of the embellishments are placed perfectly around the page and the picture is priceless. This is definitely one to scraplift!


Marge- “Princess”
I love this layout by Marge. I love the heritage photo with the soft colors she chose. I also love the fiber. It adds real character to her page. The rub-ons and felt stars finish off a beautiful design. I also love how she cut her journaling block in half. What a great idea!

Thanks ladies for sharing your creations in the TTT gallery. Come post your work everyone and maybe you will be featured in our "What A Catch" section.

Monday, September 15, 2008

October Sneak Peeks of 3 monthly kits!

OCTOBER KIT #1:
Fancy Pants--Daily Grind


  • 6 sheets Daily Grind double sided patterned paper
  • 5 sheets of textured cardstock
  • 1 12x12 Bazzill scalloped flower cardstock
  • 1 12x12 sheet Daily Grind strips
  • 1 12x12 sheet Daily Grind die cut titles and tags
  • 1 12x12 XL acrylic shape from Clear Scraps
  • 1 pkg. WRMK colored rubons
  • 5 Maya Road office sheers journaling pieces
  • 1/4 pkg. Daily Grind self adhesive coordinating chipboard pieces
  • 1 pkg. American Craft foam Thickers
  • 1/2 pkg. Kaiser Craft flower rhinestones-blue
  • 1/2 pkg. Kaiser Craft circle rhinestones-red
  • **ALL NEW**TTT Products: ~~misc transparencies designed for October #1 kit~~

    OCTOBER KIT #2:
    Scrap Within Reach--Elliot
  • 6 sheets Elliot double sided patterned paper
  • 5 sheets of textured cardstock
  • 1 12x12 Pink Paislee orange die cut cardstock
  • 1 12x12 sheet Fancy Pants All Fall cards
  • 1 pkg. Kaiser Craft epoxy brads
  • 1 pkg. Elliot Chipboard Alphabet
  • 1 pkg. Kaiser Craft colored rubons
  • Maya Road Journaling Scroll coaster set (6 sheets)
  • 1 sheet Pink Paislee brown alphabet stickers
  • 1 set Maya Road boy chipboard pieces on a chain
  • 1 Glitz roller: circled #'s (works great with ink pads)
  • **ALL NEW**TTT Products: ~~misc transparencies designed for October #2 kit~~

OCTOBER KIT #3:
WRMK: Nonsense

  • 7 sheets WRMK Nonsense double sided patterned paper
  • 6 sheets of textured cardstock 1/2 pkg. Nonsense layered chipboard words
  • 1 pkg. WRMK flocked lace (bird)
  • 1 Maya Road *new* 3 tabbed chipboard album
  • 1/2 pkg. Nonsense acrylic flower stickers
  • 1 Fancy Pants Glitter Cut: Hope
  • 1 My Mind's Eye journaling card: Unique
  • 1 pkg. October Afternoon cream alphabet rubons
  • 1 Maya Road *new* calendar turn: Feelings
  • 1 sheet 7 Gypsies chipboard: misc. symbols
  • **ALL NEW**TTT Products: ~~misc transparencies designed for October #3 kit~~

September Monthly Kit Contest

In case you didn't see the monthly kit contest information for September posted by Jen....here's the info! Remember, this contest is with the September Monthly Kits from TTT.


Circles, Circles Everywhere!


The inspiration for this month is simples...circles! I want to see LOs with circles! Requirements: You need to use a Sept 08 TTT monthly kit and you need to have at least 2 circles per LO (2 page spread counts as one LO) and at least 2 circles should be cut from patterned paper or cardstock that came in your kit. You can have as many circles as you want but you need a minimum of 2. Easy enough??? Here are some circle pictures from google images to give you some inspiration:


Now get scrapping with those Sept kits. The gallery will be created today so please post in the September 2008 Contest Work which is under the main "Use Your Monthly Kit Contest Gallery" You can also post your creations in this thread if you want to show them off but they must be posted in the gallery in order to be eligible.

You can create as many LOs as you want. Each one will receive one drawing and winner will be chosen by random draw this month. You have until midnight PST on September 30th to post your creations in the gallery.

Please refer to the rules thread for additional details, requirements, and prize details. You can contact me as well if you have any questions. Have fun and happy creating!

Jen DT & Blog Coordinator

Thursday, September 11, 2008

Sketch Ideas- September

Our very own Chrystal created this sketch and example for us. It is full of fun patterned paper blocks and a photo block that could fit just about any number or size of photos. I love her take on it with the bright colorful flowers and felt shapes. I hope you get a chance to try it out with your new kit.

Here's the sketch:

Photobucket Image Hosting

Here's the example:

Photobucket Image Hosting

Layered Mini Book


Vacation Mini Book

Step 1: Gather supplies:
Layer mini book (I used the rectangle one by Maya Road)
5 different pieces of patterned paper (Used American Crafts travel line)
3 sheets of cardstock
White and black pen
2-3 colors of Thickers
Making Memories Mini alphas
Jewels
Paper clip
Journaling spot
Ribbon, buttons and brads
Ink pad for inking the edges
Coordinating embellishments with paper line

Step 2: Cut patterned paper to the sizes of the pages. Adhere to chipboard fronts and backs. Ink edges.
Front Cover: Cut Title block, round edges, adhere to center of page, draw around edges with white pen, add title in center. Embellish with clip, jewels and badge.

P1: Adhere journaling blocks to cardstock, cut out and adhere under clip from front page. Add title with mini alphas and thickers.

P2: Cut out photo black, outline in white, adhere and embellish with foam arrow and jewels.

P3: Adhere large journaling block, attach ribbon with brads, embellish with asterisks and jewels.

P4: Cut out photo black, outline in black, glue ribbon tabs underneath and adhere. Embellish with pre-made embellishment and add title in mini alphas. Add jewels.


P5 & P6: Cut out 3 small circles (stamp on 2, outline one in white,) cut out 2 big circles and outline in white. Adhere to page. Add one circle journaling block, embellishments, and buttons (thread with floss first then tie and adhere to page with glue dots.)


P7: Leave room for a large photo, attach a cardstock strip towards the inside and doodle on it with black pen. Adhere journaling spot, jewels and pre-made embellishments.

P8: Cut 2 photo blocks (1 horizontal, 1 vertical,) outline in white, round corners and adhere. Attach title with thickers, adhere 1 word to cardstock block and doodle around the edges. Add 1 pre-made embellishment in the corner and add jewels.

P9: Adhere large cardstock block and outline with white pen. Mount journaling block on cardstock and cut out. Attach to page with and add pre-made embellishments, jewels and write out small title with mini alphas in bottom corner of photo block.

P10: Cut 2 vertical cardstock blocks, outline in black and round corners, attach and add jewels in 2 corners. Add 1 small embellishment in top left corner and mini alpha title in far corner. Adhere the journaling block to cardstock, cut out, round corners and doodle around edges in black pen. Attach small embellishment to corner.

Step 3: Assemble the book with the provided rings, tie ribbon around them and now your book is ready for pictures of your next vacation!

Tuesday, September 9, 2008

Photoshop Tip #1


Adding text to photos

Adding text to your photos can be a fun and inexpensive way to spice up your scrapbook pages. You can even use the text as the title for your page or just a fun caption or subtitle. Here are a few easy steps to take you through it using Photoshop Elements.


In the right hand corner under artwork and effects click on the “T” icon and it will bring up the text options. I chose to do ‘Outline” but you can choose to do any you like. I double clicked in that box which created a new text layer. With the text layer chosen you will see more options for your text across the tool bar at the top. You can choose the colors, size, style and font there. In the middle of your picture you will see the words “your text here” double click on the word and a cursor will appear (you will have to delete the words “your text here”.)


Now you ready to type your message.
Next you will want to take the mouse and starting at
the beginning of the word highlight it all the way
across. Then move the mouse just outside of the
highlight and select it. This allows you to move
your text anywhere on the page you would like.
Once you are satisfied with the look of your photo
select “Layer” from the toolbar then “flatten image”
this merges all the layers into one layer and allows
the image to be saved easier. Now you have a fun
photo with text for your next scrapbook page. You
can repeat these steps if you want to add more
words. Have fun and I can’t wait to see what you create!


Friday, September 5, 2008

Sketch Challenge Winner

Hey ladies. I put everyone's name in a hat and my little girl picked out:


sandym718!!


Thanks to everyone who participated.
Congratulations sandym718! Make sure you email your address to Monica so that she can send you your prize.

Thursday, September 4, 2008

Monthly Ideas: September

Your September Checklist!
by: Lindsey Krauss


As we’ve headed into September, I feel just bombarded with events and moments I don’t want to miss on a photograph or scrapbook page! So let’s work on a checklist of things to capture “on film” and on layout.

Get the camera ready for these events in September!
· First day of school
· First bus ride/mom taxi/walk to school
· Meeting the teachers
· Outside of school [pics
· Meeting buddies the kids haven’t seen all summer
· School renovations
· Lunch boxes, bags and school supplies
· Field trips
· Apple picking
· Berry picking, if you can find any left!
· Grape picking
· Labor day celebrations
· I hear Father’s Day is celebrated Sept. 1st in New Zealand and Australia!?


Get the scrap supplies out – it’s a good time to record these events:
· Go heritage! Get out those old Labor Day-worthy pictures.
· Fruit picking
· Back-to-school
· Grandparents’ Day – 1st Sunday after Labor Day
· September 11th – Patriot Day
· Changes into Autumn
· Scrap SAPPHIRE, the birthstone gem in Sept. – go with autumn blue!
· Scrap with Aster or Morning Glory-shaped flowers

Got some September ideas that you don’t see here? Please feel free to leave a comment and let us know what we don’t want to miss!

Cards with TTT Transparencies!

September Card Corner

by: Nathalie Leonelli


Here is a sketch Nathalie created
and the card she made using that
sketch and a TTT Bracket Block!
This card also has a TTT transparency on it (Grandparents Thought Block) This is a perfect card for Grandparent's Day this month!!

Blog Party WINNERS from the drawings!

TTT BLOG WINNERS FROM THE DRAWINGS:


Thanks to all of you who participated in our Blog Party! We hope you will continue to enjoy our blog and visit often.


It took a while to get all the names written out and in a bowl, but with the help of my children we got it done......each of my kids got to draw out one name from two bowls (that's there favorite part!)


Here are the winners from each drawing.....


Drawing #1: Signing In....the winner is: bishopsmommie

Drawing #2: Adding TTT to your blog or signature.....the winner is: AnnaBanana

Drawing #3: Posting a comment on TTT's blog...the winner is: Angela Loughridge

Drawing #4: Subscribing to TTT's blog via email...the winner is: Sherry Ohleiser


Winners....please email me your name and address so I can send your prize. Thanks!!

Simple Scraplift Challenge Winner

Thanks to all who participated! There were 10 entries and I put everyones name in the drawing for each item they made for the challenge. I used the random number generator to draw my winner which was.
.
.
.
.
.
#10 Congrats to Jackie AKA Funhockeymom!

Monica will send you a fab TTT prize pack!

Thanks again to all who participated I loved seeing your layouts and cards!

Wednesday, September 3, 2008

Blog Scavenger Hunt Winner!

Hi Everyone!

For those of you who played the blog scavenger hunt game, we do have a winner!

Nicole Morales

Congrats Nicole! And thanks to everyone else who played along! :)

Blog Party I SPY Game: We have a winner!

Thank you to everyone who participated in this game! I hope you enjoyed this Blog Party as much as I did! Here is the name that my DS pulled out of the hat:
Congratulations Heather a.k.a. scrappin_in_AK! Make sure you email your address to Monica so that she can send you your prize.

Tuesday, September 2, 2008

Transparency Tuesday~September 2nd

Today is Transparency Tuesday!


Each month the TTT design team creates layouts, cards and other projects using TTT transparencies on them. They always do such a great job and it's great to see all the different ways that the transparencies can be used!!


Take a look at what they created:


Layouts by: Nathalie and Carrie


Layouts by: Lindsey and Jen


Layouts by: Chrissy and Chrystal

-----------------------------------------------------------------------------------------------

Here are a few more layouts using TTT's transparencies that were created before our blog was created from DT members--both past and present...thanks girls!


Layouts by: Chrissy


Layouts by: Marilyn


Layouts by: Chrystal

Monday, September 1, 2008

September Kit #1 Layouts


TTT REVEAL DAY!


Chrystal and Carrie did a fabulous job this month creating layouts with September kit #1. Great job ladies! Remember, you can go to the TTT User gallery (http://www.transparenttouches.com/gallery/index.php?cat=46) to see all the kit reveals from each month and the TTT gallery (http://www.qbaroo.com/transparenttouchestags/index.cfm?galleryoid=0) also has an album for each DT member which showcases their layouts too. Happy scrapping everyone!


Here's what Chrystal created:


Here's what Carrie created: