Saturday, October 31, 2009

TTT Countdown to Christmas


THERE ARE JUST TWO DAYS LEFT TO ORDER YOUR COUNTDOWN TO CHRISTMAS PACKAGES FROM TTT!
(Deadline to order is November 2nd)


"COUNTDOWN TO CHRISTMAS"
packages from TTT!!!
Deadline to order is NOVEMBER 2nd.


Have a great weekend everyone!!


Transparency Winner

WINNER OF $20 in TTT Transparencies

The winner of the transparencies from people that signed up for the newsletter from the Let's Scrap site is...... JEAN (from MI)!!

Please email me with a list of transparencies that you'd like for your prize.

Tuesday, October 27, 2009

Giving your Thickers an added edge

If you love alphabets, chances are you have used or have in your stash at least one set of thickers. If you are me and they are your favorite, you have many sets of them in use and in your stash. There are many styles of thickers to choose from but once you have a set, the ways to change them up are endless!! You can always upgrade them by adding some texture or style to them. Here are a few examples of the ways you can spruce up your thickers.

Adding dots:

Simple enough right? They can really make your title pop by adding some simple dots. White shows up well on darker colors. Whatever kind of ink you use, make sure the letters dry before you handle them.

Outside outline:

No need to have a steady hand. The messy look is in folks so just have fun as you run that marker/pen around the edges. It's ok not to have perfect lines.

Etched or scratchy look:

This is my favorite way to change up my thickers. I love the distressed look. All you need is some sandpaper or a distressing tool and go to town. This works best obviously on the chipboard letters but you can do this with the vinyl ones as well. Not sure what it does to the foam ones but it might be worth a test.

Diagonal Lines with outside edge:

This is fun for a very bold look. Goes great with papers that use stripes or a very plain type page when you want the title to pop!

You can do so much more to give your thickers or any alphabets an added edge. These are just a few examples I wanted to share with you. Have fun playing!
Jen

Sunday, October 25, 2009

TTT ANNOUNCEMENTS!

The wait is over....I'm happy to announce something very exciting that will be happening with TTT next year! I had over 25 guesses emailed to me this weekend and Shelley R. from California was the first one to guess correctly! Congrats Shelley :)

Do you know what you're doing next year on 10-10-10???

Well I hope you will consider joining us for a......

7 night TTT CARIBBEAN CRUISE !!!

From scrapbooking and snorkeling to sightseeing and shopping, this Caribbean cruise is the ultimate vacation! Whether you're cruising with your spouse, significant other, friends, scrapping buddies or other family members...there's something for everyone on this cruise! (You don't have to be a scrapper!) What better way to vacation than to be surrounded by white-sand beaches, turquoise waters and the most beautiful islands on earth?

You can find out more information about the TTT cruise on our website (CLICK HERE)

More information is also available HERE (once you go to that site...just click on scrapbooking cruises and then scroll down until you see the TTT cruise on 10-10-10!)

Please feel free to email me with any questions you may have. (info@transparenttouches.com)

I hope that you can be a part of this wonderful experience with TTT!!

------------------------------------------------------------------------------------------------

Next....it's that time of year again to order your
"COUNTDOWN TO CHRISTMAS"
packages from TTT!!!
Deadline to order is NOVEMBER 2nd.


Have a great week everyone!!


Top50 Scrapbooking Kits

Friday, October 23, 2009

TTT's Countdown to a BIG ANNOUNCEMENT!


HAPPY FRIDAY EVERYONE!!!


I wanted to let you know that TTT has a VERY BIG, VERY EXCITING ANNOUNCEMENT to make!!!

You will find out what it is on MONDAY, OCTOBER 26th!!!

SOMETHING BIG is HAPPENING NEXT YEAR on...
10-10-10!!!!

Have I peaked your curiosity?? Do you THINK you might know what I'm going to announce???

You can send me an email (info@transparenttouches.com) with your guess of what the big announcement is....if you are the FIRST person to correctly guess, I will mail you a prize!!! You only get one chance to guess per day. Good luck!!


You will get an email Monday from TTT letting you know what the Big Deal is next year on 10-10-10!!! I can't wait to share with everything the exciting news :)

p.s. also on Monday, I will be sending out information for this year's
TTT COUNT DOWN TO CHRISTMAS!

Have a great weekend!!
--Monica

Thursday, October 22, 2009

Step-by-Step by Chrystal Riddell


This page can be made in a flash. If you want to save even more time, use store-bought embellishments & rub-ons instead of the handmade leaves and stamps. I actually made this page ahead of time, then added my photos afterwards. Try it...it's liberating!

Supplies:
- 1 white cardstock background sheet
- decorative edged scissors
- 3 different patterned papers in the following size: 12"x2", 12"x1" and 10"x10"
- Stamps or rub-ons
- a variety of brown inks
- sponge squares
- 1 big button
- 2 silk leaves
- 8 1/2 x 11 kraft or brown cardstock
- optional--I printed out my leaves from a free downloadable template. You can always draw yours by hand.

1. Start out by distressing the outer borders of your white background paper. I used a soft yellow, but you could add more colors for a faux finish.
2. Adhere 10"x10" (circle) paper. Adhere 12"x1" (green paisley stripe) paper.
3. Cut the deco edge of your 12"x2" strip. IMPORTANT--Only adhere the sides and bottom. This will be a mini-pocket for tucking in your photos.
4. Stamp/rub-on over the corners.
5. Print or draw the leaves and cut out. Sponge ink over surface of leaves. Crumple them out, then flatten out. Re-sponge over them with a darker color. Get creative! I also dabbed some shimmer painton mine with my finger.
6. Layer leaves and button with glue dots.
7. Stamp or rub-on sentiments.

Note: I trimmed my photos vertically, then tucked them in the pocket. When I had them positioned just right, I pulled up only the top edge of the photo to adhere them.

Wednesday, October 21, 2009

Let's Scrap giveaway continuation!

Let's Scrap Giveaway Continuation!!

Welcome to TTT's Blog! If you came here from Let's Scrap...you're at the right place for your chance to win more prizes from TTT!

As you might already know...TTT is one of the only kit clubs that offers 3 kits each month! Kit #1 is usually a girly kit, kit #2 is usually a boyish kit and kit #3 is usually boy/girl or a seasonal kit. (kit members are allowed to skip up to 2 months if there's a month that you want to pass on)

Click Here for more information about our Monthly Kit Subscriptions

Click Here for to read the FAQ's about our kits


I will be giving away $20 in TTT transparencies (of your choice)

In order to be in this drawing, you will need to just sign up for the TTT newsletter (link is below for that) and then leave a comment on this post and let us know which TTT kit (past or present) is your favorite!!!

Now that we have the TTT blog, we don't publish the regular newsletter anymore....but by signing up for this, you will get emails each month of the kit pictures and special promotions going on.

CLICK here to sign up for the newsletter

A winner will be drawn Sunday (October 28th) in the morning and then posted on the TTT blog..you have until midnight (PST) the night before that to sign up for the newsletter.

Just a reminder about TTT's kit promotion going on right now for ONE WEEK ONLY....

New kit customers coming from Let's Scrap (or anywhere else if you're reading this blog entry) can sign up for a 6 month kit subscription and receive a fun goodie bag filled with scrapbooking stuff! (Offer for the goodie bag ends October 28th)

If you have any questions....please email me! (info@transparenttouches.com)

Have a great day!
Monica


Tuesday, October 20, 2009

Cards with TTT Coaster blocks

by Nathalie

I am always on the lookout for great card sketches and once I found this one on So Sketchy! I immediately knew what I wanted to do using some of my TTT Coaster block transparencies!

Card sketch designed by Allison Cope of So Sketchy!

"You make me smile"
Supplies: You Make Me Smile (Star) Coaster Block, May kit #2, thread

"Thank you"
Supplies: Thanks So Much Coaster Block, Bazzill cardstock, WeRMemoryKeepers patterned papers and chipboard flowers, thread, corner rounder

I found that the coaster blocks were really fun to use on cards and I hope that you will be inspired to do so!

Thursday, October 15, 2009

Join us for our Creepy Crawly Crop!

Big Blinkie for Blogs

The Transparent Touches Creepy Crawly Crop starts today on the Message Board and runs through Sunday, October 18th! We would love to have you join us as we have challenges to get you scrapping, fun games to entertain you, and lots of cool prizes, including a chance to win TTT kits!!!

Tuesday, October 13, 2009

Sketch Idea

Ever find a sketch you love but just won't work with your photos? Did you ever try to flip the sketch or turn it on its side? You should. You can make any sketch work for you.

Here is an example of a wonderful sketch from pagemaps that I made work for me. All I did was flip it sideways:and I created this layout:

So, if you find a sketch you love but just don't know how to make it work...try flipping it all around. This especially works great if the sketch allows for vertical pictures and all you have are horizontal or vice versa!

Monday, October 12, 2009

Kit Winners

I'm happy to announce the kit winner from the TTT blog coming from 52 sketches, 52 weeks....

Ashley Jensen

congrats...please email me your full address so I can ship your kit to you!


The winner from the TTT blog coming from Ali Edwards' blog is......

Rochelle Stockner

congrats...please email me your full address so I can ship your kit to you!

Friday, October 9, 2009

Ali Edward weekend Giveway

Ali Edwards' Blog Giveaway Continuation!!

Welcome to TTT's Blog! If you came here from Ali Edwards' blog...you're at the right place for your chance to win more prizes from TTT!

As you might already know...TTT is one of the only kit clubs that offers 3 kits each month! Kit #1 is usually a girly kit, kit #2 is usually a boyish kit and kit #3 is usually boy/girl or a seasonal kit. (kit members are allowed to skip up to 2 months if there's a month that you want to pass on)

Click Here for more information about our Monthly Kit Subscriptions

Click Here for to read the FAQ's about our kits


I will be giving away another TTT kit! (of my choice)

In order to be in this drawing, you will need to just sign up for the TTT newsletter.

Now that we have the TTT blog, we don't publish the regular newsletter anymore....but by signing up for this, you will get emails each month of the kit pictures and special promotions going on.

CLICK here to sign up for the newsletter

A winner will be drawn Sunday (October 18th) in the morning and then posted on the TTT blog..you have until midnight (PST) the night before that to sign up for the newsletter.

Just a reminder about TTT's kit promotion going on right now for ONE WEEK ONLY....

New kit customers can sign up for a 6 month kit subscription and receive a fun goodie bag filled with scrapbooking stuff! (Offer for the goodie bag ends October 18th)

If you have any questions....please email me! (info@transparenttouches.com)

Have a great weekend!
Monica


Thursday, October 8, 2009

Keychain Mini Project

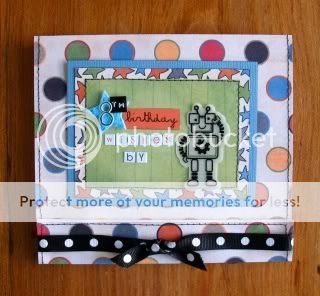
Recently Monica was selling little 3 inch acrylic keychain mini albums. Here I am going to demonstrate a fun easy way to make one. I choose to do mine all about our trips to the zoo but any trip, vacation, fun thing you love would work. The first step was to print my photos out as index prints. You can either do this yourself at home or I used Costco. Then gather your supplies. I used the TTT 2009 May kit, Heidi Swapp bling, chipboard brackets, Creative Imaginations stickers, American Crafts Thickers, Making Memories mini alphas and a set of Prima flowers.

Steps to Create:

1. Using a 2 inch punch punch enough squares of patterned paper for one side of the acrylic pages. Using a clear adhesive (I have found the Tombow vellum adhesive runner works great) attach the paper to one side of each page of the album.

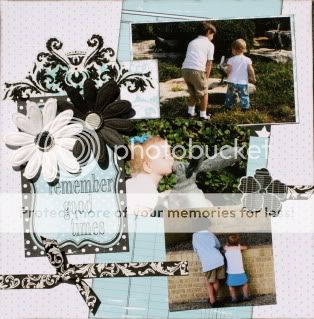
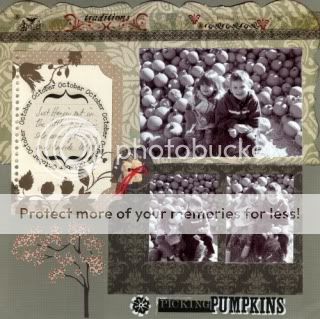
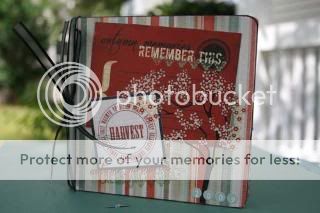
2. To make the cover choose a piece with your favorite patterned paper and accent the edges of the punched square with chipboard brackets. Add your title with thickers, add bling and attach an extra large embellishment from your kit. For the first page add your first picture, a die cut, title with small letters and bling. If you want to add ribbon you can staple it onto the paper by pulling the edge up slightly.

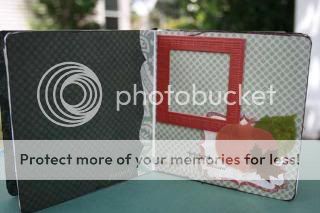
3. For the backside of these pages you can just add your photos and embellish because you will be able to see the patterned paper through the acrylic. I added a bling frame and some stickers and of course a few stickers and small title but you can embellish however you like.

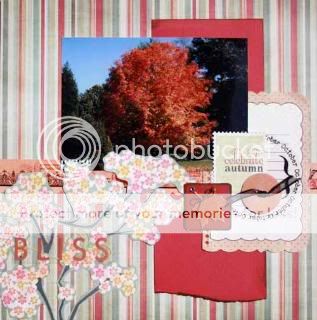
4. For these pages I thought it would be fun to add some oversize flowers that would stick out of the book. I embellished them with buttons attached with glue dots and some small stickers. I wanted to add a brad as a flower center so I cut the tab off the back and used glue dots to attach.

5. For the backside I used another flower to accent the red flower that you could see through and also cut out a giraffe from a scrap of patterned paper. On the other side I added the last pair of chipboard brackets that I had with a small title.

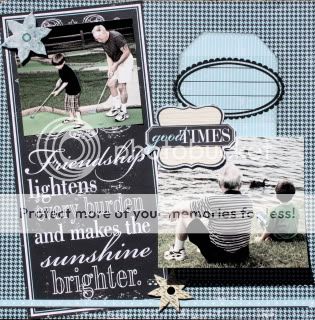
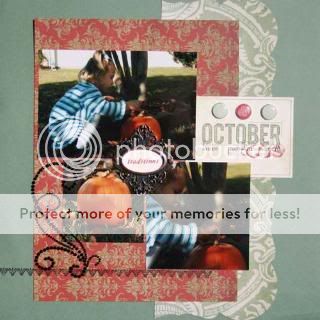
6. In my kit I had one leftover Maya Road word that I covered in glitter. I liked the look of it sticking out of the book so I added it right over the bottom of the photo. I used Zip Dry glue to attach it. On the other page I wanted to add some of this pretty ribbon so I used glue dots to hold it on.

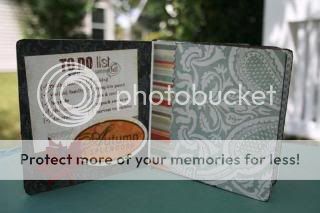
7. The page with the chipboard word I made the last page since you could see some of the naked chipboard on the backside. I still added a small journaling spot to write when and where the pictures were taken. On the other page I added a My Minds Eye transparency embellishment from my kit that I cut down to size to fit.

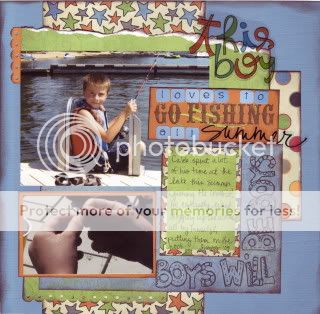
8. Then I added all the pages together and attached them with a binder clip because the album was too thick to use the keychain it came with. I hope you too try one of these fun albums. It was really cute and easy!


Tuesday, October 6, 2009

Transparency Layouts

Transparent Tuesday!
Each month the TTT design team creates layouts, cards and other projects using TTT transparencies on them. They always do such a great job and it's great to see all the different ways that the transparencies can be used!! Here is what they created this month:

Carrie and Chrystal's Transparency LOs:


Jen and Chrissy's Transparency LOs:


Nathalie's Transparency LO:

Monday, October 5, 2009

October Kit Layouts- Kit #1

It's Reveal day!

It's time to reveal the designs made with all three October kits. We hope you love the items the design team created. Remember, you can go to the TTT User gallery http://www.transparenttouches.com/gallery/thumbnails.php?album=315 to see all the kit reveals from each month!
Kit #1 is filled with lovely Teresa Collins Friendship goodies as well as other matching scrap items. You can see the kit contents here: http://www.transparenttouches.com/phpBB2/viewtopic.php?t=10152

Take a look at the lovey designs by Chrystal and Carrie.

Carrie's Designs:


Chrystal's Designs:

October Kit Layouts- Kit #2

October kit #2 is filled with fun scrap goodies from the Fancy Pants Rough and Tough line as well as other yummy goodies. To see this kit and add ons, check it out here: http://www.transparenttouches.com/phpBB2/viewtopic.php?t=10153

Check out what Nathalie and Monica created with this fun kit!

Nathalie's Layouts:


Monica's Layouts:

October Kit Layouts- Kit #3

October kit #3 comes packed with yummy goodies from the Pink Paislee Amber Road line as well as many other fun products. You can see the kit and contents here: http://www.transparenttouches.com/phpBB2/viewtopic.php?t=10154
Take a look at what designers Jen and Chrissy created with this amazing kit!

Jen's Designs:


Chrissy's Designs: