Thursday, August 27, 2009

Technique--3 Easy Ways to Use Acrylic Stamps by Chrystal Riddell


Every time I see new acrylic stamps released, I want to rush out and buy every last one. Then I remind myself of how many I already have and how I need to use them more. I think being a perfectionist and scared to mess up the layout is what often holds many of us back from using them. So I'm here to tell you that it's ok to let go and get stamping...practice makes perfect.

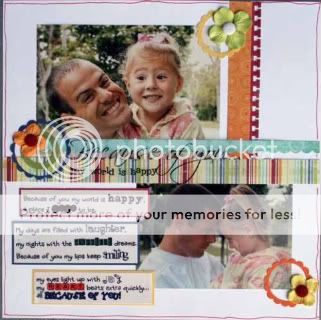
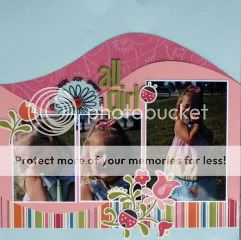
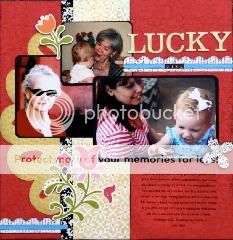
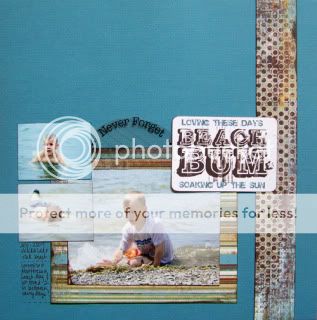
1. Using border stamps--Border stamps are an easy way to fill up white space on your page. I always arrange all the elements of the page (but don't glue down yet), then stamp my background borders. This way, if I mess up, I can just start over with a new background sheet. If you have a hard time stamping in a straight line, lightly draw one first with pencil, then gently erase with a WHITE eraser after your ink dries. (Examples of this are the far left brown border on All Dressed Up and flourish borders on Summer Vacation)
If this is still too hard to do, stamp on a separate sheet of cardstock, then cut out and use like you would patterned paper (see red strip on bottom of All Dressed Up)

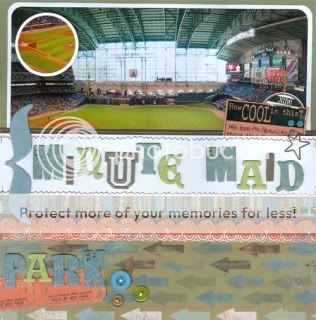
2. Use as part of your journaling--For a fun, freestyle look, pick certain word stamps to get you jump-started on your journaling, then start writing. Again for this, I stamped on a separate sheet of paper in case I messed up. I also stamped and embellished the square first, which forced me to make my journaling fit. Lined "notebook" style paper works great for this and is a sneaky way to get your kids involved on the page! (see Summer Vacation journaling block)

3. Stamping directly on your page with corners--Ok,this is scary to me, big time. I've just spent time, energy, and precious supplies to build this page, and now I might mess the whole thing up. Have courage. You can do it! This is the beauty of acrylic--you can always re-stamp over the image if necessary. I love that you can  see through your block to figure out exactly where to place the stamp. Don't forget that you need Staz-on if your stamp will cover a picture. To make a clean, crisp image, place a magazine under the layout, then stand up when you stamp to apply good pressure. (See Summer Vacation right page flourish corner and All Dressed Up big flourish corners) If all else fails, and you don't like the look, you can always cover it up with a big flower! 

All stamps used here are from Close To My Heart


Tuesday, August 25, 2009

Tag Ideas ~ Inspired by clothing tags!

by Nathalie

Recently a friend of mine challenged me to create something based on a clothing tag. I loved the idea, especially since I often keep the ones I like in my stash "just in case"... so I created a tag! Then I made another one, and another one! :)
Here are my three examples, the top one in each photo is the clothing tag and on the bottom, the tag I made based on it.

"Bracket Blocks: Thank you" transparency available here

"Halloween Thought Block" transparency available here


So before you throw away the tag from your last purchase, make sure to have a good look at it! It might bring you an idea for a card, a tag or even a page!

August Member Spotlight

by Nathalie

ScrapMel has been chatting with us on the message board and sharing her creations in the Gallery and I wanted to find out a little more about her so I invited her to be our August Member Spotlight. Thank you for answering my questions ScrapMel! It was fun to get to know you better!

Your TTT member name?
ScrapMel

Tell us a bit about yourself and your family (and pets?)
I have three boys, ages 6, 4 and 1; one Jack Russell puppy and 5 fish.

How did you get started in scrapbooking? How long have you been scrapbooking?
Five years ago a former co-worker took me shopping for some basic supplies. Three months later, she apologized to my husband for creating a monster, ahem, I mean, an AVID scrapbooker. About three years ago, I turned 100% digtial. Now? I do whatever strikes my fancy (or whatever the designers I 'CT' for need, lol)

What is your favorite place to scrap?
In my home,
in my bedroom, at my desk. That is where all my things are and I never know what I will need to complete a layout! I am definitely not a planner - I love chaos!

What are your favorite scrapping snack and drink?
Coffee ... and sometimes I sneak some ice cream in there ...

What product(s) are you addicted to right now?
I just got a Silhouette ... and I love it! I also love textured AC cardstock. And my Big Bite. And my Photoshop.
OH! and my Fiskars Fingertip craft knife! If you think it looks weird and hard to use, it is not so! Paired with my magnetic ruler/self-healing mat and Tim Holtz Design Ruler ... I am a pro at cutting straight lines now!

What inspires you creatively?
I know everyone always says "Everything!" but for me, it is very true. I follow a LOT of blogs (I found TTT through Ali Edwards' blog) that deal with scrapbooking (duh!), home decor, art, mixed media, writings, muses, family life, etc.

Cousins by ScrapMel
What brought you to TTT?
Ali Edwards : )

What do you enjoy the most about TTT?
The people - amazingly friendly and helpful; AND the choice of kits!

What is on your scrappy wish list?
Yikes! Everything? My latest wish was the Silhouette - and I just got it. So I am not looking to want for anything ... at least for a month. Though all the blogs showing all the new products showcased at CHA right now is NOT helping!

What is something about you that we may not know??
I work full time as a research scientist for a pharmaceutical company. And, as you probably guess, I NEVER sleep (therefore the coffee listed above as my drink choice!)

Thursday, August 20, 2009

Composition Books turned into themed Journals...and a giveaway!

Well let me start off by saying I did not plan to post altered composition books for my project this month. I had planned to share with you a fall mini album which I used a past TTT kit. I had done the cover but it took me a while to finish the album and I thought I would share that. I thought I took pictures but if I did, I cannot find them on my computer. Then I said, well no problem, I'll take new pictures. That would be easy if I could find the mini album (and it's not that mini in size, lol). So I am posting instead 2 journals I made a while back. With it being back to school time, composition books are on sale for as low as 29 cents I've seen and what a cheap item to purchase and alter and make as a gift or for yourself. I decided to make a baby journal and a "me" journal.

Basic supplies needed:
-Cardstock or patterned paper...composition books are 7 1/4 x 9 3/4...4 sheets or scraps this size will cover both the front and back as well as inside front and back covers
-Alphas to do titles
-paint...i painted the edges of both books and also the spine of the baby journal
-misc embellishments- I used rub ons, stamps, cut patterned paper, tags, and ribbon

Instructions:
-Paint edges of front, back, and inside covers...paint spine if color is too dark
-Cut and corner round your paper for the covers and inside. Since you painted the edges, it's ok if your paper doesn't go to the edge completely.
-Adhere paper to covers, ink edges if desired
-Either stamp or adhere ribbon to the book edge
-Apply your title and embellishments as you would like
-Ink edges around book and inside covers...I even inked a bit on the back for a shabby kinda look
-Enjoy your new very inexpensive journals!

Picture of Baby Journal- front and back (giveaway item)


Picture of Me Journal- front and back


Giveaway: I have no need for the baby journal as my youngest is four and I know we have a few designers and customers expecting or maybe you just had a baby or maybe your friend is having a baby...whatever the reason as long as you can use it, I would love to send this to someone who can use it. Soooo if you are interested in receiving it, post a comment here on or before Sunday Aug 30th and I will draw a name on Monday August 31st. The journal is in pale pink, blue, and cream...very neutral for a boy or a girl. This drawing is open to TTT designers as well. Goodluck.

Tuesday, August 18, 2009

Step by Step

Lots of Layering

Supplies:
  • 3 sheets cardstock
  • 4 patterned papers (3 scraps are ok)
  • 2 photo corners or make them from scraps of pp
  • 1 paper flower and 1 die cut flower
  • 4 buttons
  • chipboard letters or thickers
  • brackets (hand cut, die cut, chipboard, etc.)
  • 1 journal spot
  • small piece of ribbon
  • 2" square punch
  • stapler
Step 1: Use one 12x12 piece of patterned paper for your background but punch a 2"square from the middle first by folding it in half to save for later. Layer a 10.5" square piece of cardstock to the middle of the patterned paper then another 10" square piece of cardstock on top of that.


Step 2: Mat 2 4x6 photos onto two cardstock mats 4.5 x 6.5. Adhere them near the top of the
10" square. Punch 3 more 2" squares from patterned paper and adhere those in a row under the photos.

Step 3: Add flower to bottom left hand corner of left photo. Adhere bracket over top and one overlapping the bottom of the right photo. Use chipboard or thickers to add title in between. Add a button for the flower center. Glue photo corners (use premade ones or make your own from patterned paper) to the top corners of the cardstock mats. Staple a piece of ribbon to a journaling card and tuck under top of right photo. Adhere die cut flower and 3 buttons to bottom right corner of cardstock mat overlapping the bracket. And your done!

Sunday, August 16, 2009

What a Catch!

With so many great layouts from the TTT monthly contests and challenges it was hard for me to narrow it down to just 3. So I picked 3 fun summery layouts and 1 altered item that caught my eye. With summer in full speed there has been alot of orange on layouts lately. I love how the color orange brings such a fun, happy feeling to a layout! So here are my 3 summery pics from the TTT gallery.

The Mask by toni-n-tn: Love the orange paired with teal. That big wave gives it a great summery feel too! A scraplifter for sure!


Cousins by Scrapmel: Love the orange patterned paper as the background here. And who doesn't love the use of the TTT journaling block? Cute page and pictures!

Petting Zoo by Marge: Not alot of orange but just the right amount to POP! And aren't those pictures just adorable. I love how you put the circles behind the title. Great idea!


Wall hanging by Jonna: Ok no orange here but I love the vintage colors she chose mixed with the red. It's perfect for a husband gift. It's fabulous!

Saturday, August 15, 2009

TTT September Monthly Kits!

TTT September kits are up!!

Today is reveal day at TTT!!! There are three great kits offered for next month and they are on the message board and the TTT Blog.


NEW MONTHLY CONTEST RULES: We have a new rule with the monthly contest. . . you can use ANY TTT KIT to create your layout for the monthly contest. It no longer has to be the current kit. What a great way to have fun with your TTT kits and possibly win something to go with your kit next month! Details are on the Blog or you can also go here: http://www.transparenttouches.com/phpBB2/viewforum.php?f=65 for the details on the message board.

I wanted to remind you that TTT offers 3 and 6-month Kit Subscriptions! If you sign up for a subscription this month, you can start with June #3 kit or you can start with one of the July kits. Just send me an email after you sign up letting me know which kit you'd like to start your subscription with.


Refer a friend to TTT! If you refer a friend to TTT and they sign up for 6 months, you will BOTH get a goodie bag with your kit! Once you refer a total of 3 friends to TTT and they sign up, you will receive a FREE KIT!


Click Here for more information about our Monthly Kit Subscriptions


Click Here for to read the FAQ's about our kits


September kit #1(new My Mind's Eye: Whirlybird from Abbey Road) To view the addons/pre order Holiday items available click here: http://www.transparenttouches.com/phpBB2/viewtopic.php?t=10055


September kit #2 (new My Mind's Eye: Round and Round from Abbey Road) To view the addons/pre order Holiday items available click here: http://www.transparenttouches.com/phpBB2/viewtopic.php?t=10056


September kit #3 (new Cosmo Cricket Earth Love & Boyfriend) To view the addons/pre order Holiday items available click here: http://www.transparenttouches.com/phpBB2/viewtopic.php?t=10057

Cards with Sketches

by Lindsey.

I've been working on cards lately so I thought I'd post a few card sketches - My intent is to also try these as layout sketches. If you use them and would like to share, please upload in TTT's User Gallery and come to the board to let us know!

Friday, August 14, 2009

Transparency Technique

TTT Tip
Ever wonder where you're going to fit journaling into your mini album? Well, pull out your TTT transparencies! Instead of leaving pictures out, leave your journaling out. Out on a TTT transparency that is!! For one on my mini albums I used TTT coaster blocks to include my title, journaling, and date. I didn't have to sacrifice any pictures!

For my 4th of July mini album I used TTT coaster blocks to include fun elements and journaling.

The possibilities are endless so have fun including TTT transparencies into your next mini album!

Tuesday, August 11, 2009

Transparency Layouts

Transparent Tuesday!
Each month the TTT design team creates layouts, cards and other projects using TTT transparencies on them. They always do such a great job and it's great to see all the different ways that the transparencies can be used!! Here is what they created this month:


Here is what Jen and Carrie created:


Here is what Chrissy and Nathalie created:


Here is what Chrystal and Lindsey created:

Sunday, August 9, 2009

August Ideas

by Lindsey Krauss.

Welcome to A-U-G-U-S-T!! I hate to think that summer's almost over, so let's think of more ways to celebrate in the last month of summer vacation, ok?

Layout themes
my summer vacation
water fun
fun in the sun
beach day
swimmin', pool time!
summer fruits and vegetables
did your garden grow?


August shapes
sunshines all around!
cute cupcakes and candies
fruits and vegetables everywhere!
water drops
circles
waves


Photography ideas
shots of garden-picking
water fun - get your underwater camera!
cover up - get shots under towels, the camera or the subject
upside down - the camera or the subject :)
get around the ponds, lakes and oceans, and snap away
back to school shopping - chronicle it!

Wednesday, August 5, 2009

Aug Kit LOs #1

It's Reveal Day!!!!!

It's time to reveal the kit work from all three August kits. We hope you like what the designers did this month!!

Aug kit #1 is full of fun and bright papers and embellishments. Take a look at what both Chrissy and Chrystal created with this kit.

Chrissy's LOs:


Chrystal's LOs:

Aug Kit #2 LOs

August kit#2 is packed with cool fun colors perfect for the beach, summer, amusement parks or whatever you fancy! Check out what Carrie and Lindsey did with this month's kit!

Carrie's LOs:


Lindseys LOs: