Thursday, January 29, 2009

Project Idea

Reduce, Reuse, and Recycle Your Stash Ornaments!!


If you're like me you have a TON of goodies in your stash. Well, dig out those goodies and start making some great holiday ornaments.

Supplies (all from your stash):
Chipboard Shapes
Paper
Embellies: (stickles, buttons, stickers, ribbon, eyelets (yes I said eyelets!!) flowers, etc.)

For this project I decided to use some of the chipboard shapes I've had in my stash for quite awhile and some holiday paper and embellies from last year. All you have to do is decorate the chipboard shapes with holiday paper and embellies. When you're finished, punch a hole at the top of each ornament, squeeze in an eyelet, and thread with ribbon. Finally, hang them from a Christmas Tree!

Here are a few examples:


Tuesday, January 27, 2009

Sketch Idea with Sample Layout

This month Carrie created a beautiful layout of her and her little girl inspired by a wonderful sketch!


Thanks for your inspiration Carrie!

Tag Ideas

Supplies:
MME glitter shapes
Winter patterned paper
Ribbon
TTT transparencies
Other: (stickles, buttons, etc.)

Have fun creating some wonderful, winter tags using TTT's winter words, titles, and phrases transparencies. All you need to do is adhere winter patterned paper to a pre-cut tag, embellish as you wish, and finish with a transparency!!

Here are a couple examples:

Thursday, January 22, 2009

Portland CKC & Fabulous Scrap RETREAT!

Scrappin' Getaway
Portland, Oregon
Scrapbooking Retreat
(same weekend as the CKC convention!)

I have met many of you (TTT customers) at past retreats, conventions, through scrapbook stores that I taught classes at, and other scrapbooking events all over the northwest. I wanted to let you know that I will be at the Portland Creating Keepsakes convention in March this year! I will have a sales table during both crop nights at the convention. If you are planning on attending, stop by my table and say hello!

I also wanted to let you know about a ONE OF A KIND scrap retreat going on that weekend too! My friends at Scrappin' Getaway have a retreat going on all weekend long at the fabulous Doubletree Hotel which is within walking distance of the CKC convention. Come and be pampered while scrapping all day and all night! The retreat is March 6-8th. For more information, you can visit their website which is: http://scrappingetaway.com/index.html

If you decide to sign up to attend the retreat, you can send them an email letting them know you heard about the retreat from Monica at TTT and you will get a free prize from them when you check into the retreat!! I hope to see many of you at CKC AND the retreat!!

Also. . . another Scrappin’ Getaway retreat is in the planning stages for Spokane, WA in June! I am very excited about having one near my home and will have fun scrapping with you in Washington!!

January Member Spotlight!

by Nathalie

I had the privilege of interviewing one of our talented (and funny) TTT Member for our blog. Here's your chance to get to know more about Annette!

Your TTT Member name? jazzgodezz

Tell us a bit about yourself and your family (and pets?) I'm married to my best friend, Steve and we have three boys, Joe, Michael and Sean. I'm a blessed SAHM who loves to read, write, and scrapbook. I have a double degree in music performance and education, but have stayed home with my kids since 2001. My husband is a major in the USAF, flying the B-1B. I have a cat, Doc, and a dog, Inara who both think that "they" should be the center of my universe.

How did you get started in scrapbooking? How long have you been scrapbooking? I've been scrapbooking for 10 years and I enjoy making pages that my kids will be able to pass on to their families. I started in 1998 at a CM party and haven't looked back since. Although I've got memory books and clippings from grade school.

What is your favorite place to scrap? I prefer to scrap at my local scrapbook store, but I don't get to go as often as I'd like. Mostly once or twice a month, otherwise, I'm at home cramming it in when I can. I teach classes at the store occasionally, so I can't complain!

What is your favorite scrapping snack and drink? Diet Coke and carne asada taco. YUM. Trust me. These are to DIE for.

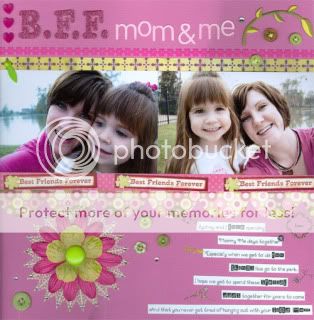
What product(s) are you addicted to right now? BLING. If it glitters, I'm going to use it. I love flowers and am NOT afraid to use them on my boys' pages. I really tend to use glitter when and wherever I can. Unfortunately, that means I'm usually wearing it too. My friends love to tease me about where it ends up: hair, face, shirt...floor.

What inspires you creatively? I love to look at blogs of all types of styles. I will look there before I start to scrapbook to get things in my head and then I'll look through sketch blogs and books. This really helps me get "in the zone" when I need to really scrap.

What brought you to TTT? I was looking for a little change in my kit subs. I had heard some great things about TTT and took a peek at the past kits. I loved what I saw and that I got a choice in three kits. I've been here ever since.

What do you enjoy the most about TTT? Monica. Seriously. She has never let me down with her kits. I get to choose or add MORE to my monthly box. She offers addons to complement each choice and some extra special purchase items. The variety is perfect for me. I know I can count on a GOOD kit that I WILL use.

What is on your scrappy wish list? More bling? I love rhinestone stickers and I'm also wishing that I had a Bind It All... I see a lot of potential (damage) here!

What is something about you that we may not know? I'm pretty much an open book. But, I worked at an NPR station while in college. I did the production crew, setting up performances, recording, and even sound. But I really loved doing the on air work the best. I would work every Saturday night from 6-12 and do the on-air segments. I'd also help out during the week during the prime morning sessions. That was the best job I've ever had. I miss it!

Thank you so very much Annette for sharing a bit about yourself with us. To see more of Annette's work, go check her blog:

Monday, January 19, 2009

Photoshop Tips for Elements

Blurred Backgrounds and Color Cutout Photographs


Now that the Holidays are over I know you have tons of new photos to scrapbook. The problem with Christmas photos though is that so many of them are busy with all the family and wrapping paper in the backgrounds that the photos end up being a mélange of colors taking away from the subject you are photographing. A good way to resolve this issue is with a simple Gaussian Blurred Background or a Color Cutout technique. There are many other things you can do using this same technique such as sepia background with color, black and white, blurred, and solid backgrounds. You just have to use your imagination. I hope you give this a try and if you do share it with us under the Photography section of the Message Board.


Blurred Background Photos

I am going to start with adding a Gaussian Blur to the background of this photo. I love how my daughter is looking at her present. She looks so sweet and excited but the craziness of everyone opening presents is taking away from her.


Before:

Steps:

  1. Go to Layer > Duplicate Layer(do this twice because the original layer is locked and you will be doing 2 different steps.)
  2. Select the top layer then go to Image >Magic Extractor (Magic Extractor allows you to select part of an image so that you may alter the photo without changing that part.)
  3. First you will want to select the first tool called the Foreground Brush tool.This tool allows you to select the portion of the photo that you will want to cut out, the part you want to stay the same.You do not need to make a solid line just put dots around the image this tells Photoshop that this is the part you want to cut out.If there is a drastic change in the colors of this section like a face compared to hair you may want to put a few dots there too.Photoshop just goes by what is similar in color.Zoom in on small section of the photo and place your dots, 20 pixels is a good size to use for your brush.
  4. Zoom in on a small section of where you will be cutting out and select the second tool, Background Brush tool, this you will want to make a solid line around the area you are cutting out.Once again 20 pixels is a good size for the brush.Make sure though you drag it along the background and on the edge of the part you are cutting out.In my examples it is right up against the red dots.
  5. Once you are done zoom out by hitting CTRL Z and the minus key. Make sure your selection looks correct.You may erase any mistakes if necessary with the third tool, Point Eraser Tool.
  6. Then click Preview in the upper right hand corner.This will show you the cutout image.Sometimes there will be parts you wanted to select or deselect but don’t worry that is easily fixed.
  7. In my example her face was not selected when I had wanted it to be.To fix this click on the fourth tool, Add to Selection Tool, with this tool you will just be painting the parts you want back on so you can have the brush at 100 pixels unless you want to just touch up a few fine details. If part of your picture was left and you didn’t want it to be you can use the fifth tool, Remove from Selection Tool, to paint away the parts you didn’t want.
  8. Once you are satisfied with your cutout portion click OK.Then select first layer to make changes to the background.For this example I selected Filter > Blur > Gaussian Blur.Then you can use the slider to adjust the amount of blur you would like.For this example I wanted the background quite blurred so I went with 7.
After:
Before:

Color Cutout Photos

Color Cutout Photos can be really fun at Christmas time because there are so many bright decorations, clothes, hats, presents and new toys. For this example I choose to keep the new present in color and turn the rest of the photo black and white focusing more on my nephew looking at his new present.


Before:

Steps:

  1. Follow above steps 1-7. But when keeping a portion of the photo color try to be more exact in the cutting out of your selection.
  2. Once satisfied with your cutout click OK. Then select the first layer to make changes. For this example I selected Enhance > Convert to Black and White. Then I selected Enhance > Adjust Lighting > Brightness/ Contrast. You can use the sliders to adjust the white black contrast of the photo with the brightness/ contrast sliders.
    After:

Hope you give this new technique a try! Can’t wait to see your fun new Christmas Photos!


Expanding your label maker's possibilities

by Nathalie
I love the look of Dymo text on scrapbooking projects but the colors of tape that are available are pretty limited. Here is one easy way to expand your color options:
All you need is a label maker (I have the Label Buddy which costs me less than $6), a paper trimmer, a sanding file or other sanding tool and white core cardstock (this technique does not work without the white core!), I am using DCWV cardstock here.

First, cut a strip of the cardstock with your paper trimmer. It has to be the size of the tape or slightly skinner. For my Label Buddy, I typically cut the strip at 5/16".

Then, feed the strip through your label maker. I have to push it in a little while clicking on the front to make it move forward. I also leave the back open while I type my text.

The text will look like this coming out of the label maker. As you can see, it is raised a little.

With your sanding tool, sand the text area very lightly until it shows.

You can see the end results up close here:

And the overall results on the following pages:

Let me know if you have any questions.

Card Ideas

by Nathalie

Chrystal Riddell was inspired by TTT transparencies and Becky Fleck's sketches (at www.pagemaps.com) to make a couple of cards for us.
Here she used the You & Me pocket block and added a flower embellishment right on top of it. I love the contrast of the bright papers and the black transparency.

On this other great card, Chrystal used part of the Doodle Art10- Journal Cards Transparency. She cleverly added her sentiment and enhanced her big flower at the same time by adding the transparency under it.
 
If you are interested in purchasing those transparencies you can find them here: http://qbaroo.com/transparenttouchestags/

Thank you Chrystal for your creative cards this month!

Friday, January 16, 2009

What a Catch!

Look what caught our eye in Transparent Touches' gallery lately!

Emelyn- Our Baby Boy
I just adore this LO. The colors are great and I love the use of multi photos, yet the LO doesn’t feel packed. I love the use of the metal and chipboard as well. The distressing adds a nice touch as well and makes certain elements pop!
Great LO Emelyn!

Mona- Sing Star
This LO just pops! I love the paper layering and the small touches such as the staples and the brads strategically placed. I love the twine running across the photo as well. This LO is just great.
Thank you for sharing your talented pages with us Mona!

Venturi (Barb)- Always and Forever
I love the circle background as well as the 3 pictures displaying the ring and their parts. The bling is a wonderful touch for a ring LO. I love how you did the title too! It’s a wonderful page to show off! I like the writing on the picture too, giving it a personal touch.
What a wonderful page Barb!


Thursday, January 15, 2009

Step-by-Step

by Lindsey Krauss
January Step by Step

Title:
Layering, Layering and more Layering!
by Lindsey Krauss

Here is a little how-to on my layering steps for the layout, "SNOW". Tips: use many mediums, lots of textures, literally layer and don't be afraid to scrap messy. Old supplies mixed with new add depth and dimesion, as well as visual interest.
Lastly, work your edges!

Step one:
Ink select edges of base papers.
Step two:
Use edge scraper on next level up, then ink only the back of the side opposite the photo. This can suggest a nice shadow behind it.
Step three:
Punch holes/set eyelets in the shadowed level strip.
Step four:
Layer pieces without adhering.
Step five:
Add sticker borders as another medium, texture and layer.

Step six:
Add photo and ribbon, adhere all layers thus far. Pull up sides of eyeletted level and leave rough.


Step seven:
Doodle along border edges for yet another layer suggestion.

Step eight:
Doodle edges - just for fun!

Step nine:
Add journaling:

Step ten:
Add sticker letters, using realistic images can promote even more depth. Add paper flakes/flowers and a brad to build the layers right there.

Step eleven:
Voila!