Friday, February 27, 2009

Wednesday, February 25, 2009

Technique--ModPodge by Chrystal Riddell

Recently, on the TTT message board, someone asked what in the world you do with Mod Podge. Some of you might be asking, "What the heck IS Mod Podge?" Hopefully this will help make it seem a little less scary!

According to the jar, Mod Podge is a "water-based sealer, glue, and finish for all surfaces." I have used this many times, and never actually read the jar! I'm a trial-by-error kind of girl, so I just tried some different things to see what worked for me and discovered a wonderful adhesive that's great for certain projects. I prefer Gloss, although you can also get it in Glitter and Matte formulas

Photobucket

Glitter--My main use for MP is as an adhesive for glitter. Nothing works better, or faster, than this to evenly cover large surfaces. I use it for chipboard accents. It couldn't be easier than this...grab a foam brush, cover your chipboard completely with a thin coat, and sprinkle on the glitter. The jar says the MP takes 15-20 minutes to dry, but I find a thin coat is usually dry in less than 5 minutes, so work fast. Here, I've done some variation using naked chipboard. This was hard to photograph the detail, so you'll just have to try it yourself. Together, all of these only took about 10 minutes total to complete! While preparing for this, I used a package of naked chipboard that is at least 2 years old! Now that it has some pizzazz, I am much more likely to use it. So if you have only a few minutes, but want to play, try this yourself. Next time you need that glittery something, you'll have some of these already on hand.

Photobucket The top left flower is the original naked chipboard. Top left square button--MP only, then add glitter. Bottom left--Acrylic paint, then MP, then glitter.

Sealant--Another great use for MP is as a sealant over wood, painted wood, painted chipboard, and paper. I have used this on chipboard mini-albums, board books, altered wood mirrors, clipboards, and chipboard embellishments. IMPORTANT: Because it is water-based, you must use it from the bottom up or it will wrinkle your paper and ruin all your hard work! I learned this the hard way. So, don't use a tape runner to adhere your cardstock or paper, then try to seal it. In the picture above, the green chipboard flower was painted with acrylic pint, then sealed with MP. For the star, after I traced and cut out the patterned cardstock, I applied the MP to it, applied it to the star, then sealed the top. This works best with cardstock weight. If you use thin paper, it is more likely to wrinkle or tear through. If you are applying this to a large surface, you can gently use a credit card to smooth it out so it won't wrinkle.

This can be a little tricky, and I wouldn't start right off with your most prized paper or embellishment, but with a little practice, you can become a pro at this!

Thursday, February 19, 2009

What a Catch!

Look what caught our eye in Transparent Touches' gallery lately!

"Sky" by Lisawd

Can you see how Lisa's choice of papers and background brings out

Sky's blue eyes hence accentuating how she got her name? Love that!

The flowers going across the page are superb and the color combination

is one of my favorites!

“Crawl Away” by Bessie


The title definitely caught my attention on Bessie's page. I love that

it follows the curve of the circle and how she doodled on the alpha

stickers to make them stand out even more. I like the slant of the

photos and the cute strips of patterned papers behind are just perfect

for her subject!


"Altered Lunch Box" by Sneakybacon


I enjoy altered projects and even more so when they are this

practical! Tammy (a.k.a. sneakybacon) did an awesome job decorating a

lunch box to put away her dies. What a great idea! And she used the

pretty papers from her August TTT kit to do so :)

Thank you all for sharing your creations with us!

Wednesday, February 18, 2009

Tag Ideas

Tags by Natalie

Like me you probably have a few of those big bags full of kit leftovers and scraps. Well, as we love "to use up that stash", I was determined to use only those for this assignment. Also, instead of just making tags to embellish my pages, I thought about giving them an added purpose: to hide the journaling. Every once in a while, we all like to write details or feelings only intended for our subject... or sometimes, it's just fun to have an interactive piece on the page.

So here are my three examples of hidden journaling tags and pockets:

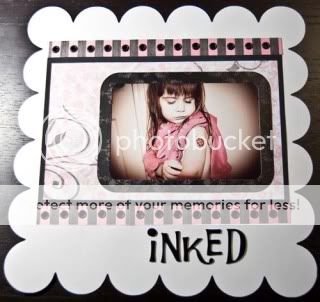
This one features a TTT transparency called "Friends Thought Block" available in the TTT store:
Here is all of them together:

Tuesday, February 17, 2009

Step by Step


12x12 Layout Instructions

Gather Supplies: Bazzill scallop cardstock, solid cardstock, patterned paper line, letters, embellishments, 1 photo

  1. Cut a 9.5 x 6 inch rectangle from your cardstock, cut ¾ inch strips from patterned paper and a 9 x 5.5 inch rectangle from patterned paper.
  2. Adhere smaller rectangle inside bigger one then adhere to scallop cardstock. Attach strips above and below the block.

  1. Add photo to right side of block and embellish with frame
  2. Punch holes along strips and attach eyelets. (Use up that stash!)
  3. Add title at bottom right

  1. Add painted grungeboard or chipboard element next to title (I used glitter mist on mine to make it shimmery.)
  2. Embellish title and 4 corners with bling.
  3. Add 3 stars, hearts, flowers (whatever works for your page) down the left side of your photo.
  4. Write journaling on a matching tag, tie with ribbon and slide under photo with the top corner sticking out.


And you’re Done!

Sunday, February 15, 2009

**March Kits Sneak Peek**

TTT March Kits Sneak Peek!

There are two great kits being offered for March! Please send me an email letting me know which one you'd like. (info@transparenttouches.com) For more information about reserving your kit, please go here: http://www.transparenttouches.com/phpBB2/viewtopic.php?t=9074
March Kit #1: Pink Paislee-Sweet Cakes mixed with Prima: Mommy & Me

for full details of this kit, go here: http://www.transparenttouches.com/phpBB2/viewtopic.php?t=9324


March Kit #2: Great boy combo kit featuring 3 different paper lines!!

for full details of this kit, go here: http://www.transparenttouches.com/phpBB2/viewtopic.php?t=9325


February Monthly Kit Contest

February Kit Contest: USE UP YOUR KIT!!!


This month is going to be soooooo easy! Why you ask? Well because ANYTHING GOES!!!!! You can make whatever kind of pages or projects you want to enter. How easy is that? The main requirement is that you need to use a Feb 09 kit. Please refer to the rules post in this forum for additional details. Due date this month will be my midnight PST Feb 28th. Winner will be chosen by random draw this month. You can enter as many times as you like and will receive one entry per LO. 2 page LOs count as one entry. You can post your pages on the message board to share but in order to be in the contest you must post your pages in the gallery under the "February 2009 Contest Work Gallery".

For more info. about the contests each month, please go here: http://www.transparenttouches.com/phpBB2/viewforum.php?f=65

Thursday, February 12, 2009

February Ideas!!!

February Ideas by Lindsey Krauss

February is here, how are those New Year’s resolutions going? Well, you know this month – break out the Valentine-y, lovey dovey, red, pink and white! Or, don’t!! I created a page for this month, still about love, but all in brown and blues – quite liberating! Try your next Valentine page in something other than traditional styles, colors and themes.

Nothing wrong with traditional, though, so here are some more ideas.

Shapes:
Hearts and stars.
Circles – as in our love goes round and round.
Polka dots – because they’re often as cute as our loved ones.
Wings – bring ‘em back into your next page, straight from Cupid!

Themes:
Love – Cute, romantic or even grungy!
Love/Hate
How you met
Valentine plans: past, present and future
Your first Valentine (a person or spent together)
Memories
Broken hearts

Techniques:
Journaling is strongly making a comeback – if it ever really left the “in” crowd. Take the February opportunity to make notes, write stories, record memories at length on your pages.
Scrape it! Use that edge scraper, sand paper, files and tear it up.
Add ink, paint, glitter, sprays, liquid and alcohol inks to give it a little more edge.
What’s a girl’s favorite gift? Gold. Bring back the gold – find new ways to use old gold embellishements – all over!

Have fun and be in love this month, and don’t forget to share! Come show us your February layouts – link us up and show in the TTT user gallery. Can’t wait to see what you create!

Thursday, February 5, 2009

February DT kit layouts

FEBRUARY DESIGN TEAM KIT LAYOUTS

Chrissy and Jen did a fabulous job this month creating layouts with the February kit #1. Chrystal and Lindsey created some awesome layouts with kit #2. Great job ladies! Remember, you can go to the TTT User gallery (http://www.transparenttouches.com/gallery/index.php?cat=46) to see all the kit reveals from each month and the TTT gallery(http://www.qbaroo.com/transparenttouchestags/index.cfm?galleryoid=0 )also has an album for each DT member which showcases their layouts too. Happy scrapping everyone!


Here is what Chrissy created with the kit #1:


Here is what Jen created with the kit #1:


Here is what Chrystal created with the kit #2:


Here is what Lindsey created with the kit #2:

Tuesday, February 3, 2009

Transparency Layouts from TTT Design Team!

Transparent Tuesday!

Each month the TTT design team creates layouts, cards and other projects using TTT transparencies on them. They always do such a great job and it's great to see all the different ways that the transparencies can be used!! Here is what they created this month:


Layouts by: Carrie and Chrystal


Layouts by: Jen and Chrissy


Layouts by: Lindsey and Nathalie