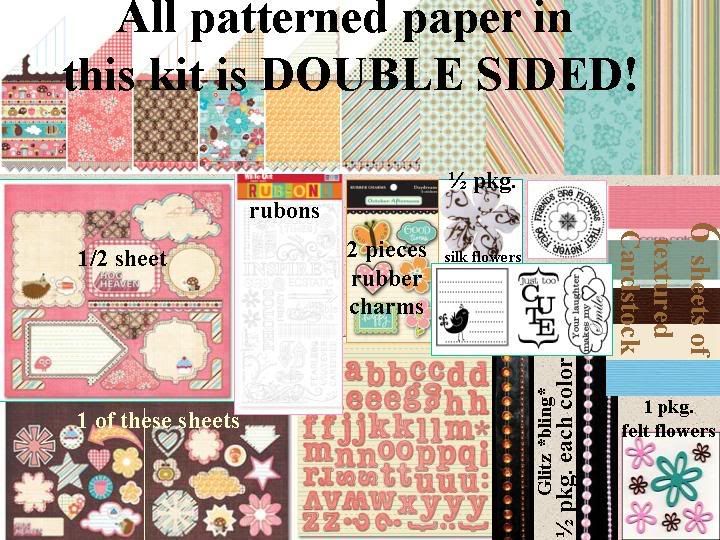
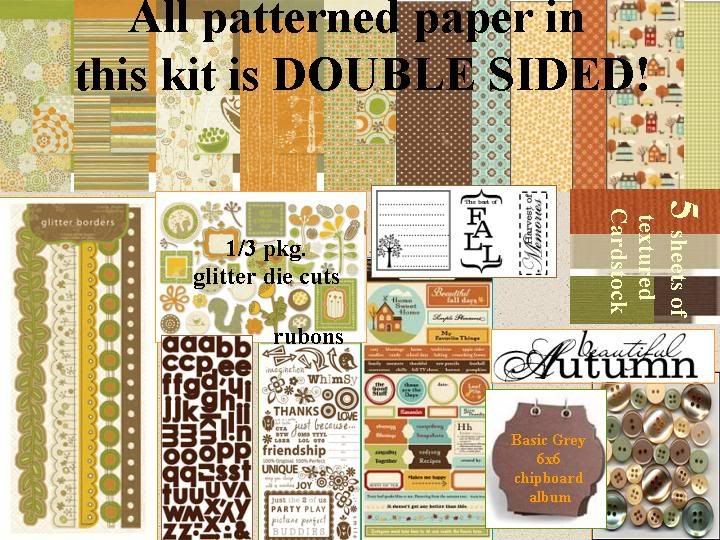
Monday, October 27, 2008

October Step-by-Step by Chrissy Greenman

Step-by-Step

Supply List:
1-5x7 picture and 3-2 1/2 x 2 pictures
4 pieces of patterned paper
2 pieces of coordinating cardstock
5 chipboard shapes
bling
buttons
rub-ons title
rub-on flourishes
scallop scissors or punch


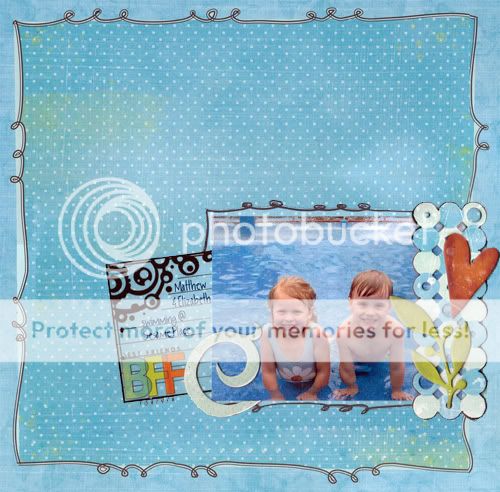
1. Cut a 3/4" strip of paper and adhere it to the left side of your page. Use scallop scissors or punch to add more character.

2. Attach a 5x7 picture to the right side of your strip of paper about 2" from the top.

3. Cut two strips of paper 2 1/2" and 2". Use your scallop scissors or punch and cut along the bottom of each strip. Attach the largest strip first (about 1/2" from the bottom of the large picture) and then place the smaller strip on top of it allowing for 1/2" of the large strip to show on the bottom.


4. Cut three pictures to 2" by 2 1/2" and adhere them in a strip to the bottom right side of your 5x7 photo.

5. Stitch along your strip of paper on the left side of the page. Then, stitch around your large photo. Finally, stitch along the top left side of the stri
ps of paper under your large photo.

6. Choose any chipboard shapes (you will need 5) and embellish them as you would like: paint, rub-ons, paper, bling, buttons, etc. Attach three of them to the right side of your large photo and two of them to the left side of your strip of pictures.


7. Add your title under the strip of photos placing it slightly off center.

8. Add rub-ons next to your chipboard shapes.

9. Journal on cardstock and cut into strips. Attach a few to the top left of your page and the rest to the bottom left of your page.


10. Embellish your journaling strips with bling and rub-ons.

Thursday, October 23, 2008

Photoshop Tip #2

Color Saturated Sepia Photos

After seeing Anna Banana’s mini book with the August kit I thought I would touch more on the subject of adding filters to your photos. I love the look of her Sepia photos with a hint of color still in them. I think this helps to be able to match your photos easier to patterned paper. It can be used in many ways to just soften your photos or make them look more old fashion.


Fist you will need to open the photos you will be editing in Photoshop Elements. Then in the tool bar at the top select FILTER then ADJUSTMENTS then PHOTO FILTER. In the dialog box make sure that FILTER is selected then in the drop down box select SEPIA. Then adjust the setting under DENSITY to your liking. Click ok and your done.

Here are a few examples and the density settings I used.

I wanted to tone down the bright colors in this photo of Sydney playing at the beach. I set the density to 90%.

For this wedding photo I wanted it to look more old fashion but still leave some of the fun color in it. I used this technique and set the Density to 100%.

For the last photo I wanted to just give it a wash of sepia to make it a little softer. I love the look it gives to indoor photos that have a lot of orange in them it really tones it down. I set the density to 70%.

I hope you try this technique on your next photo!

Tuesday, October 21, 2008

Transparency Technique - fun with rub-ons!

Did ya know? I didn't!
Rub-ons and Your Transparencies

Just recently I discovered that you can use rub-ons right on a transparency! I don’t know why I never tried it before, but I’ve now realized that it’s an easy way to add color and flair to your transparent pages.
This layout, using an 8.5” x 11” TTT transparency, uses only patterned paper and rub-ons as embellishments, aside from the 2 brads anchoring the transparency. It was so much fun using these super colorful and bright rub-ons from the Fancy Pants TTT October kit in layers creating a depth with the transparency as another layer.

See all these rubons, here? Let’s start from the layer bottom to top. The black stitching rub-on (WRMK) is rubbed onto the background paper, under the patterned. The blue stitching (Daisy Hill) is also under the transparency, but over the patterned paper, as is the smaller arrow and beige flower (WRMK). On top of the transparency is the larger arrow and turquoise flower. The large beige and orange flower is slightly on the transparency – and there is not even an interruption in the design. (You can also see this in the little birdie, lower right, on the full page.)


There is also some depth on the left-hand side of the page, under and over the black flowers printed on the transparency. I used the WRMK kit rub-ons: a line of circles is under the transparency and each printed black flower is adorned with a flower on top of the transparency. Above this strip is another rub-on, a large set of flowers and swirls that run off the transparency onto the patterned paper; again, no interruption!

So the next time you’re thinking of adding a little color and depth to your transparency, think rub-ons! Link your “rub-on-+-transparency” layouts here for us all to see!

Thursday, October 16, 2008

Project Idea: Altered Vertical Organizer
By Nathalie
Suggested materials:
- USPS Flat rate box (new or used)
- large scissors
- white paint
- coordinating papers (3 to 4 12X12 sheets)
- various alphas (such as AC Thickers)
- black ink
- black pen
- embellishments (brads, flowers, stickers...)
                                                                                 
1/ Cut the flat rate box as shown.
Stand the box with the opening side up, measure from the bottom up 12 1/4" all around the box and cut. Then, from the top front corner mark the 4" points on the top edge and going downward. Trace a line going from one point to the other and cut as indicated by the dotted line. Repeat on the other side. 

Alternatively, you can put your box next to a Cropper Hopper to trace the angle.

2/ Cover all markings and red corners with white paint.

3/ Now pick the papers you want to place on the sides and on the front and cut them slightly smaller than the box. You can then adhere them to the box.


4/ Add embellishments. I cut a big flower from my paper, cut it in half and traced and cut it from 
another paper to create one big flower going on the side but you can use anything at this point to make this your own. I added Thickers on the front to indicate what will go in my organizer. Two other flowers cut from paper and brads finish the front of my box.


5/ Since my box is going to sit at the end of my shelves, I also added something to one side of it. i just inked in black some random chipboard letters (great way to use leftovers!) and applied them to the lower part. Finish off with some doodling if you choose and you're done! You now have a unique (and economical) organizer which can be used for lots of things. I am planning on making more for my cardstock, kits and papers!

Let me know if you have any questions. Thank you!

Wednesday, October 15, 2008

**November Monthly Kit Sneak Peeks!**

It's reveal day!! My favorite day of the month :)
Take a look at the 3 new kits for November!
  • 6 sheets Hog Heaven double sided patterned paper
  • 2 sheets October Afternoon Daydream double sided patterned paper
  • 6 sheets of textured cardstock
  • 1 sheet Hog Heaven sweet treat stickers
  • 1/2 sheet Hog Heaven adhesive cardstock journal tag stickers
  • 2 October Afternoon Daydream rubber charms
  • 1 pkg. WRMK white rubons
  • 1/2 pkg. Glitz pink frosting *bling*
  • 1/2 pkg. Glitz brown frosting *bling*
  • 1 12x12 sheet Hog Heaven monogram alphabet stickers
  • 1/2 pkg. Imaginisce silk flowers
  • 1 pkg. Butons Galore felt flowers
  • **ALL NEW**TTT Products: ~~misc transparencies designed for November #1 kit~~

  • 6 sheets Hometown double sided patterned paper
  • 2 sheets Scenic Route Appleton double sided patterned paper
  • 5 sheets of textured cardstock
  • 1 12x12 sheet Appleton die cut arrows
  • 7 misc. Hometown journal cards
  • 1 12x12 sheet Hometown die cut shapes
  • 1 pkg. Buttons Galore buttons
  • 1 sheet Daisy Bucket rubons
  • 1/3 pkg. Kaiser Craft epoxy brads
  • 10 misc. Maya Road ticket sheers
  • 1 XL acrylic bracket set from Clear Scraps (2 pieces)
  • 1 pkg. Hometown alphabet stickers--2 colors
  • **ALL NEW**TTT Products: ~~misc transparencies designed for November #2 kit~~


  • 5 sheets Lemon Grass double sided patterned paper
  • 3 sheets October Afternoon Weathervane double sided patterned paper
  • 5 sheets of textured cardstock
  • 1 pkg. Lemongrass glitter borders
  • 1 pkg. SEI brown alphabet stickers
  • 1 Basic Grey 6x6 chipboard album
  • 1 sheet Weathervane cardstock stickers
  • 1 pkg. WRMK brown Nonsense rubons
  • 1/3 pkg. Lemongrass glitter shapes
  • 1 pkg. Buttons Galore buttons
  • **ALL NEW**TTT Products: ~~misc transparencies designed for November #3 kit~~

November Extra Items

Below are some extra things available this month...you can click on the picture to make it bigger


Tuesday, October 14, 2008

Sketch Ideas - October
by Nathalie
This month, two of our Design Team members are sharing with us pages they have created based on sketches.
Jen used a Pagemaps sketch (www.pagemaps.com) to make an 8.5X11 LO about her daughter and her grandparents:


I love that she used a B&W enlargement and that she gave it a slant, making it stand out even more!


Carrie created her own sketch to make a page about her "wild" and "crazy" girl:


I love the extra large B&W here as well and, notice how all four borders are different and so creative!


I hope these sketches and examples get you inspired. If you do use them, please share a link with us in the comments below! Thank you Jen and Carrie!


Monday, October 13, 2008

Turn on the Inspiration- 5 week running contest!


Transparent Touches is having a running TV show themed contest and we are so excited about it! Here are the details for the first week:


For those of you who watch this show, you are probably familiar with the theme of the show... Outwit, Outlast, Outplay. This is the mantra of the show and thus will be our theme for this week's challenge. You do not need to watch the show or be a fan to use the theme to create.

SHOW us your LOs using Outwit or Outlast or Outplay (or a combo of all three) LOs. You can use this theme any way you would like such as sports type LOs, children playing LOs...anything that would somehow fit with the theme. You can even do a LO on being a fan of the show if that interests you. Bring it on and I can't wait to see what you create.

OTHER REQUIREMENTS: You need to use at least 2 pieces of patterned paper and one piece of chipboard.

You can create more than one for this week if you would like. Each LO completed will count as one entry into the final grand prize drawing.

You must upload your LO to the "Turn on the Inspiration Contest Gallery" by midnight Oct 19th PST. Please include in the title "week 1" or "wk 1" so that I can match it up easily with the challenge. Thank you.

You do not need to sign up for this contest and you can participate each week or just one week but keep in mind if you do complete all weeks in time, you receive an extra entry into the grand prize drawing.

Tomorrow a game will be posted so play along with that this week if you would like.

Please see the original post in this section for additional details, rules, and prize info.

LOs should be newly created specifically for this challenge.

If you have any questions, please do not hesitate to ask. Have fun and get creative!

Here is the original post with all the contest details and the other shows that will be featured: http://www.transparenttouches.com/phpBB2/viewtopic.php?t=8693

Thanks and we hope to you see play along!
Jen
DT and Blog Coordinator

Thursday, October 9, 2008

What A Catch

What A Catch is when a design team member picks LOs or projects from the gallery and shares what they find special or intriguing about the work. This month I found 3 wonderful layouts to share with you!


I love this layouts by "funhockeymom25" (Jackie) The picture is absolutely adorable and I just love the cuteness and simiplicity of this layout. Great job!!


This next layout to the left is by CPetrazio (Connie). I love the black and white photos that she used and love the fact that the swirls and flowers look perfect with this layout even though it's with boys. Way to go!!
-
This beautiful layout above is by toni-n-tn. I love the colors on this layout the most! I like the fun design, the family quote and the stitching. Super job!

Tuesday, October 7, 2008

Transparency Layouts

Today is Transparency Tuesday!
October 7, 2008

Each month the TTT design team creates layouts, cards and other projects using TTT transparencies on them. They always do such a great job and it's great to see all the different ways that the transparencies can be used!!
Take a look at what they created this month:
layouts by: Chrystal and Chrissy
layouts by: Lindsey and Nathalie
layouts by: Jen and Carrie

Friday, October 3, 2008

Card Corner

Card Ideas
by: Chrystal Riddell

TTT bracket blocks are great to use for sentiments on a card!


Card sketches by Becky Higgins at pagemaps.com


October Ideas to Photograph and Scrap

October Ideas to Photograph and Scrap
by: Lindsey Krauss

Are you ready for October? I think a scrapbooker always is! Here is a ‘short list’ of things to catch in October – enjoy!

Things to Photograph & Scrap
· Visits to the orchards and pumpkin patches
· Petting Zoos
· Pumpkin picking
· Pumpkin arranging
· Pumpkin decorating
· Pumpkin carving
· Pumpkin guts (one of my ooey, gooey favs!)
· Baking those autumn pies and goodies
· Leaves about to fall
· Leaves falling
· Leaves that have fallen. Piles!
· Raking
· Kids in leaves
· Adults in leaves :)
· Homework time (scan and crop a bit of homework for the patterned paper or as embellishment to homework pictures)
· Field trips
· Scarecrows
· Mums
· Hay bales
· Hay rides
· Tractor pulls
· Halloween – picking out/trying on costumes
· Halloween – decorating and decorations
· Halloween – getting ready, the day of
· Halloween costumes
· Haunted houses
· Trick-or-Treating – you got the walk up, the knock, the words, the receiving and the smiles afterward
· Visitors along the way
· Your treat bag/box/bucket before and after
· Fuzzy socks
· Warm jammies (p.j.s)


Scrap Supplies:
· Lots of orange!
· Warm colors – browns, reds, oranges, yellows, hunter greens and dark blues
· Circles
· Stitching
· Fabric
· Browns for inking and journaling
· Dark and spooky patterns and colors – think black, orange, green with a spice of yellow here and there
· Leaf and Halloween die-cuts, if you dare!
· Flowers with more than 5 or 6 petals

Autumn is one of my favorite seasons to scrap… if you get a layout or two done for the fall season and you’d like to show, link it up here! Have other ideas and titles not mentioned? Comment them below as well! Happy October!

Wednesday, October 1, 2008

October Kit #1 Layouts

It's REVEAL DAY!!

Nathalie and Lindsey did a fabulous job this month creating layouts with October kit #3. Great job ladies! Remember, you can go to the TTT User gallery (http://www.transparenttouches.com/gallery/index.php?cat=46) to see all the kit reveals from each month and the TTT gallery (http://www.qbaroo.com/transparenttouchestags/index.cfm?galleryoid=0) also has an album for each DT member which showcases their layouts too. Happy scrapping everyone!


Here is what Nathalie created this month:


Here is what Lindsey created this month: