Friday, October 29, 2010

Cool Technique: Stamping with your embellishments

by Nathalie

Have you ever thought of using your embellishments to stamp on your pages and cards? That's what I did here and I am sure that you already have the supplies in your stash! A stamp pad (the "juiciest" the better) and embellishments with different shapes are all you need.

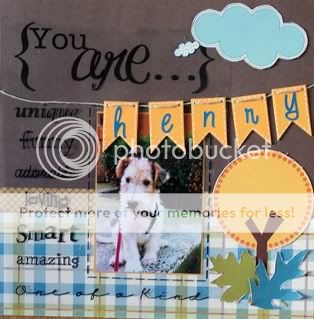
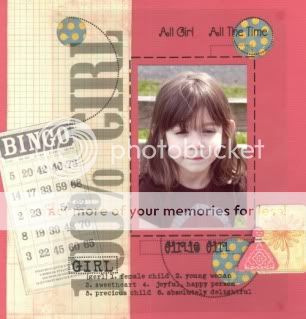
This technique is best if you do not want a crisp image. It was my goal for this page so I used a velour flower from the kit (October #1) that I simply dabbed on my ink pad and stamped manually on the background paper:

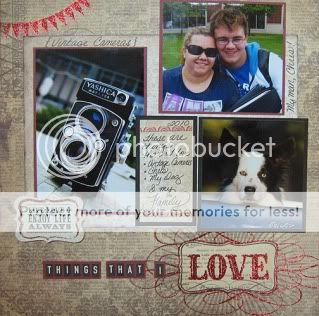
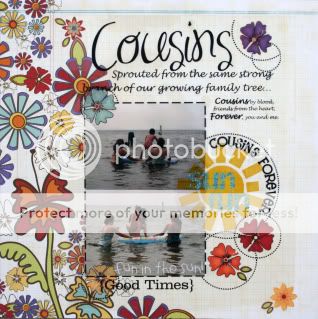
For this second project, I used a piece from a Thickers set that I simply stuck on my acrylic block:
Now go experiment and make sure to share with us your creative results!

Wednesday, October 27, 2010

October 2010 TTT Kit Designs- Kit #1

Take a look at the wonderful designs completed by Nathalie and Carrie using Kit #1. This kit featured Jillibean Soup papers Pasta Fagiloi mixed with a few Fancy Pants!

Nathalie's designs:


Carrie's designs:


October 2010 TTT Kit Designs- Kit #2

Take a look at the wonderful designs completed by TTT designer Chrissy using TTT Kit #2. This kit featured paper from Pink Paislee Old School Line.

Chrissy's designs:


October 2010 TTT Kit Designs- Kit #3

Take a look at the wonderful designs completed by TTT designers Jen and Candy using kit#3. This kit featured Bella Blvd one Fall Day paper. Enjoy!

Candy's Designs (A big welcome to Candy for joining our TTT DT!):


Jen's designs (coming soon):

Wednesday, October 20, 2010

Halloween printable freebies from around the web

by Nathalie
As you might already know from this project, I love printable freebies and at this time of year, you can find a great selection for Halloween decor, parties, treats, pages and more. It is so easy to print them and put them together in an afternoon (or less), I thought I would share some of my favorite finds:
Spooky spinners by Owlsorts (a variety to print)


(I am thinking these would be great as part of a banner!)

And finally, this is just one of my favorites from
Have fun with these (I know I will!) and please remember to give credit to their respective sites/blogs if you post your creations online!

Saturday, October 16, 2010

Sept Monthly Sketch and Layouts

Did you know that each month the design team uses a sketch for one of their designs? We usually post the sketch in our design gallery and then label in remarks which page used the sketch for each designer but since we have issues right now with the TTT gallery, I wanted to share the sketch for September and our layouts using the sketch.

September Sketch (from pagemaps.com):


By Candy and Nathalie:


By Jen and Carrie:

Friday, October 8, 2010

Transparency Layouts

Hi Everyone!
Here are some layouts created by the TTT designers using some of TTT's own transparencies.

By Jen and Carrie:

By Chrissy and Nathalie:


Thanks for looking!

Saturday, October 2, 2010

October Challenge: "I can't believe..."

by Nathalie
Your challenge for this month is a journaling/title challenge: Use the sentence "I can't believe..." in your journaling or in your title.

Here is my example created with the September kit #3:
"I can't believe you're a Middle Schooler!"

Contest Guidelines:
Since we are having problems with the User Gallery, please share your layouts in this post on the message board or include a link to your entry right here on the blog by midnight PST on October 31st. The page needs to be new and created for this challenge. One winner will be drawn to win a TTT prize pack!
Anyone can participate and you can use whatever scrap materials you want to. It does not need to be created with a TTT kit. Two page lo's count as 1 page.

I can't wait to see your interpretations!

Friday, October 1, 2010

October Monthly Kit Contest: Use a TTT transparency!

by Nathalie
They come in every kit, every month, so this should be easy (and fun) for you!
The contest this month is to use a TTT transparency on your project: layout, card, mini, altered project, anything just use a TTT transparency!

Here is an example of a page I did with the September kit #3. I used a small "A Day to Remember" transparency on top of my photo:

Now onto the small print:
The main requirement for this contest is that you need to use a kit from Transparent Touches, any kit. Please refer to the rules post in this forum for additional details.

Due date this month will be midnight PST October 31st. Winner will be determined by drawing.

You can enter as many times as you like but pages must be new and created for this contest. 2 page LOs count as one entry.

You can post your pages two ways: share it with us on this post in the forum or here on the blog by linking your layout from another gallery or your personal blog. I look forward to seeing your entries.

If you have any questions, post them here or on the message board.

Haunted Halloween House


For a fun Hallowen decoration this season that you can use over and over every year try creating a Halloween house. You can use the doodlebug chipboard house that I chose hear or lots of craft stores carry cardboard or wood haunted houses for you to decorate.

  1. Now pick your theme, cutesy or spooky? I chose cute since a 4 year old was helping me.
  2. Next make sure you have 2 pieces of the same patterned paper (preferably one that repeats and isin't hard to match up at the sides)
  3. Assemble your house according to manufacturer decorations (some of you won't have to do that step.)
  4. Adhere the patterned paper around all side of the house (I used a glue runner)
  5. Next cover roof, door, chimney and stairs (the great thing about the doodlebug house is it gives you pattern pieces to help you cut out all these pieces but if you are using another one maybe just try your craft knife and some sandpaper to clean up the edges.)
  6. Using a hot glue gun apply buttons all over roof (this is the most fun for the kids cause they can stick them all over.....just be careful of the hot glue.)
  7. Adhere a button for the door handle and some over the middle of windows for decoration.
  8. Attach doodle bug trims (or any other kind, you could cut strips of paper and punch them with border punches) around window box, chimney, and edge of roof.
  9. Poke a hole in the top of chimney and thread a pipe cleaner through. Attach a flying object to it ie. bat, ghost, witch.
  10. Add some cobwebs to window with a little hot glue and some black rhinestones for decoration on window box
  11. Have your little one pick a few more creatures (cardstock diecuts) to add to the house. We used a hanging spider and a mummy at the door. Add a few to the sides (I really loved the skulls and headstones....gave it a graveyard feel) All attached with just a little hot glue.
  12. Now enjoy your new decoration. And if your little one is at all like mine they they will think it is theirs and that it should go in there room for their toys to play in. :)